


Installing the SN4120 23
SmartNode 4120 User Manual 3 • SmartNode installation
Installing the SN4120
SN4120 hardware installation consists of the following:
• Placing the device at the desired installation location (see section “Placing the SN4120”)
• Connecting the interface and power cables (see section “Installing cables”)
When you finish installing the SN4120, go to chapter 4, “SmartNode initial configuration” on page 25.
Placing the SN4120
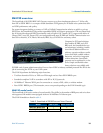
Place the SN4120 on a desktop or similar sturdy, flat surface that offers easy access to the cables. The unit
should be installed in a dry environment with sufficient space to allow air circulation for cooling.
Note
For proper ventilation, leave at least 2 inches (5 cm) to the left, right, front,
and rear of the unit.
Installing cables
Connect the cables in the following order:
1. Connect the ISDN terminal to the BRI port (see section “Connecting the SN4120 to the PBX or ISDN
BRI NT” on page 23).
2. Connect the 10/100Base-T Ethernet WAN (see section “Connecting the SN4120 to the IP network” on
page 23)
3. Connect the power supply (see section “Connecting the SN4120 to the power supply” on page 24)
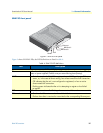
Connecting the SN4120 to the PBX or ISDN BRI NT
The SN4120 comes with one or two ISDN BRI ports located on the rear panel (see figure 1 on page 16).
Using an ISDN cable, connect the BRI (TE) port of the SN4120 to the NT PBX or ISDN NT.
For details on the BRI port pinout and ISDN cables, refer to Appendix C, “Cabling” on page 42 and Appendix
D, “Port pin-outs” on page 45.
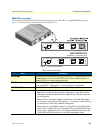
Connecting the SN4120 to the IP network
The SN4120 comes with a 10/100 Base-Tx Ethernet port for connection to an IP network. The Ethernet
WAN interface is factory-configured as a DHCP client, so you must connect the SN4120 to an IP network
that provides a DHCP server.
The Ethernet port (ETH) includes an automatic MDX (auto-crossover) feature that automatically detects the
cable configuration and adjusts accordingly. The feature allow you to use a straight-through Ethernet cable to
connect to an Ethernet hub or switch. Typically the hub or switch will connect to a router that provides the the
local-residential IP network with broadband Internet access.
Do not work on the system or connect or disconnect cables during periods of
lightning activity.