


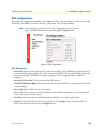

Configure the IP address 19
3088/I Getting Started Guide 2 • Initial configuration
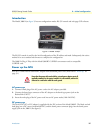
1. Start a HyperTerminal session on the PC using the settings:
9600 bps, 8 data bits, no parity, 1 stop bit, no flow control
2. Log in to the RocketLink-G NTU using the factory-default login (superuser) and password (superuser):
Login:
superuser
Password: *********
Login successful
Modify the IP address
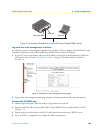
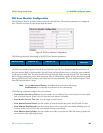
1. Display current IP interface settings for the RocketLink-G Ethernet LAN port.
ip list interfaces <enter>
IP Interfaces:
ID | Name | IP Address | DHCP | Transport
—-|———|————————|—————|———————
1 | ip1 | 192.168.200.10 | disabled | <BRIDGE>
——————————————————————————
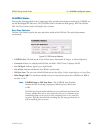
2. Modify the IP address for the LAN port according to your network requirements.
ip set interface ip1 ipaddress 10.10.4.10 255.255.255.0
Note The above IP address (10.10.4.10/24) is only an example. You must choose
an IP address on the same subnet as your PC.
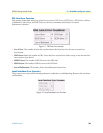
3. Verify the new address is correct and save it in system boot memory.
→ ip list interfaces <enter>
→ system config save <enter>
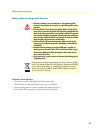
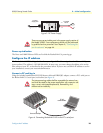
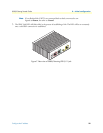
Connect to the local IP network
Now you can connect the RocketLink-G NTU to your local IP network and complete the remaining configu-
ration from your PC using a standard web browser.
Connect the RocketLink-G NTU’s Ethernet port (green) to the same Ethernet segment as your PC (see
figure 5). The front-panel Ethernet Link LED should turn on. If it does not, press the rear-panel MDI-X switch
so that the Ethernet Link LED illuminates.
You can check the connection with the ping command. For example shown in figure 5, you would ping
10.10.4.10 from a PC on the IP network.