Pelco Manual C361M-A (8/02) 5
MOUNTING
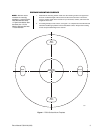
Attach the scanner to a flat surface or compatible wall/ceiling/pedestal mount using four
bolts (not provided).
CAMERA/ENCLOSURE MOUNTING
1. Center (balance) the camera and lens, or enclosure, camera, and lens load on the tilt
table. Adjust the positioning as needed to align the mounting holes.
2. Attach the camera or enclosure to the tilt table with two 1/4-20 hex head bolts (not
supplied).
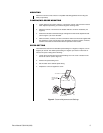
3. Position the tilt table at the desired angle and tighten the manual tilt adjustment bolts
(refer to Figure 3) to secure the table.
4. Make all camera, enclosure, and lens connections. Refer to the manuals supplied with
the equipment. Leave enough slack in the cable/wiring so that the camera, enclosure,
and lens connections do not interfere with the operation of the scanner.
SPEED SETTING
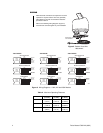
The PS20 Series scanner has selectable speed settings for 3 degrees, 6 degrees, and 12
degrees per second. The default speed setting is 6 degrees per second. To decrease or
increase the speed setting do the following:
1. Loosen the screw that secures the speed setting cover. The cover is located on the
side of the scanner (refer to Figure 3).
2. Remove the speed setting cover.
3. Set the switch to the desired speed setting.
4. Replace the cover and tighten the screw.
Figure 4. Scanner Adjustments and Settings
36 12
12
SPEED
SETTINGS
TILT TABLE
MANUAL TILT
ADJUSTMENT
BOLT
LIMIT STOP
00813


