


16
EasyTouch Load Center Installation Guide
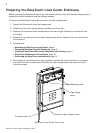
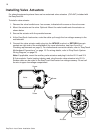
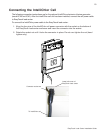
Installing Valve Actuators
For shared equipment systems there are two motorized valve actuators (CVA-24T) included with
the EasyTouch kit.
To install a valve actuator:
1. Remove the valve handle/cover four screws, indicated with arrows on the valve cover.
2. Mount the actuator on the valve. Optional: Mount the valve handle onto the actuator as
shown below.
3. Secure the actuator with the provided screws.
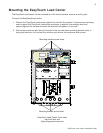
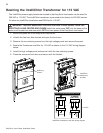
4. At the EasyTouch load center, route the cable up through the low voltage raceway to the
motherboard.
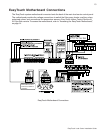
5. Connect the valve actuator cable plug into the INTAKE (suction) or RETURN three-pin
sockets on right side of the motherboard (for more information, see Item 2 and 3 of
Plumbing requirements on page 3). For motherboard connection details, refer to “EasyTouch
Motherboard Connections,” on page 13. For wiring details, refer to “EasyTouch System
Wiring Diagram,” on page 23.
Note: If applicable, mount the auxiliary valve actuators and plug it into the VLV A and VLV
B 3-pin sockets. If solar heating is being used, plug the solar valve actuators into VLV A.
Excess cable can be coiled in the EasyTouch load center low voltage raceway. Do not coil
the wire in upper low voltage compartment.
Screw
Screw
Valve
Actuator
Screw