


Connecting to a computer
Notes:
– The data input is suitable for both Apple Macintosh
computers (Power Book and Power Mac) as well as for
IBM compatible PCs.
– The data output of IBM compatible PCs can be connected
directly to the projector using standard data cables.
– Apple Macintosh computers may need a conversion plug
(optional) added to the standard data cable.
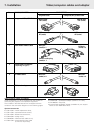
– The figures in brackets (1) correspond to the figures in the
accessories diagram.
The characters in brackets (a) correspond to the characters in
fig. 2 of ‘Controls and connections’.
Caution!
Always switch off the projector before making any connections.
USB connection
A USB interface is available via an upstream connector.
When the projector’s
USB (upstream) connector
is connected
to a PC or an Apple Macintosh computer equipped with a USB
downlink connection, it will identify as a USB device.
It is possible to:
– control the cursor of the computer via the projector remote
control,
and
– the display settings of the computer will be changed to fit
the capability of the projector.
Note: If you experience problems using the USB connection,
please refer to the user guide or support information of
your computer.
PC (Desk Top/Notebook)/
MACINTOSH (Desk Top/Power Book/Power Mac)
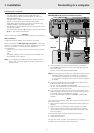
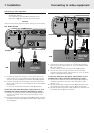
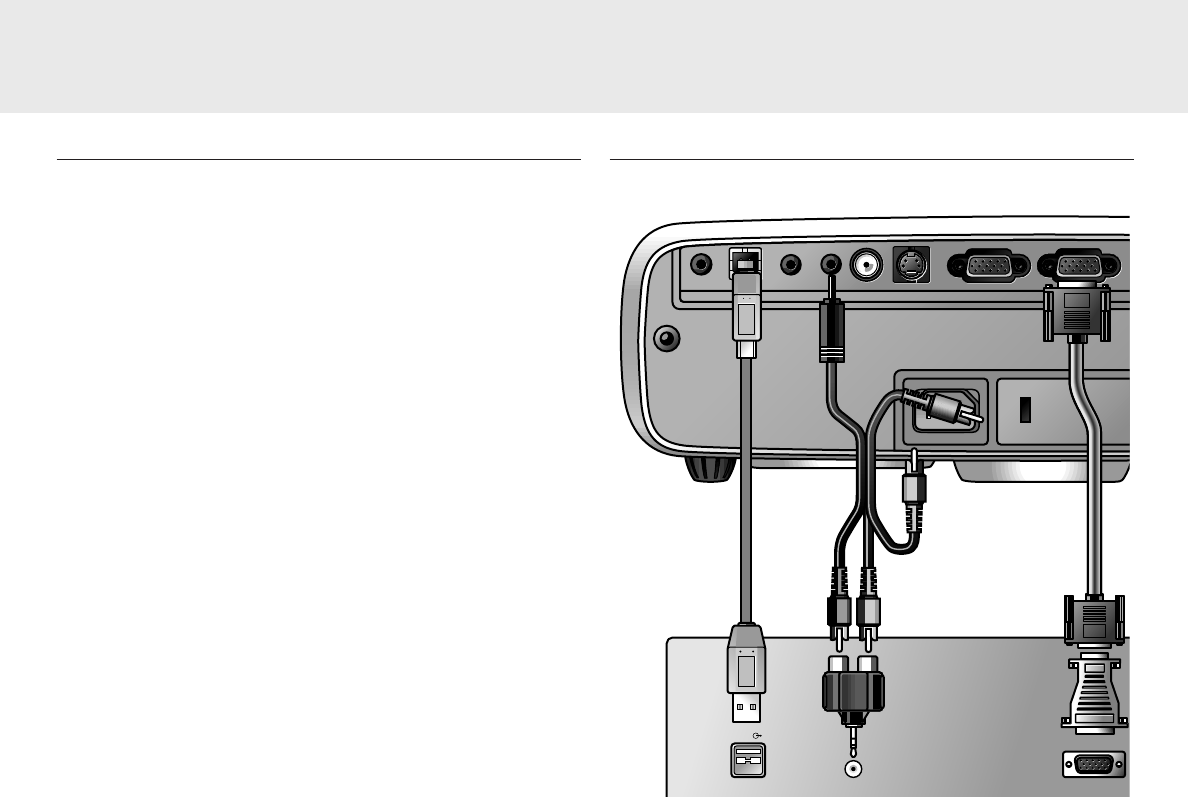
1.
Connect the Data out terminal of the computer to the Data in
terminal
(h)
of the projector and secure the plugs by tightening
the thumb screws.
For this, use the VGA/USB cable
(1)
supplied.
Note: When connecting the projector to a Macintosh computer use a
VGA/MAC adaptor (optional). The adapter is only needed if
your computer is equipped with a 2 row, 15 pin connector. If
your computer is equipped with a 3 row connector no adaptor
is needed.
2.
Connect the USB (upstream) socket
(b)
of the projector to the
USB downstream port of the computer.
For this, use the VGA/USB cable
(1)
supplied.
– You can now manipulate the mouse cursor on the computer and
on the screen, using Cursor Control.
3.
If you wish to hear audio information from the computer via the
projector speaker, connect the Audio out socket of the computer
to the Data audio-in socket
(d)
of the projector.
For this use audio/video connection cable
(2)
and adapter
(5)
supplied.
Notes:
If the mouse cursor does not react when using the cursor control on
the remote control:
• Check that the batteries are installed properly and/or replace the
batteries.
• Make sure that the USB cable has been properly connected.
• Check that the projector receives the signals from the remote
control (LED ring around the Standby button will fast flash when
receiving a signal).
If no audio information is heard via the projector speaker:
• Check (AV) Mute setting.
• Check Volume setting.
You can also make an Audio out connection to an external
amplifier. See ‘Connecting to audio equipment’.
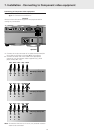
Projector
Data out
Audio out
Data out
Mac/PC
USB
USB
Audio out USB Video S-Video
Audio out USB Video S-Video
Video audio-in
Data in
Data out
Video audio-in
Data out
Data in
Data audio-in
Data audio-in
(1)
(1)
(2)
(b)
(d)
(h)
(5)
optional Philips
VGA/MAC
adapter
7. Installation
11
Connecting to a computer