


30 Philips · Laserfax 5120 · 5125 · 5135
EN
Memory Philips
The fax memory can store up to 200 pages. Follow the
specifications in the technical data.
Message Memory Full!
Using Service Codes
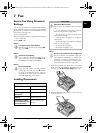
Receiving Fax Manually
Receiving Fax Manually
Select manual fax reception under fax reception mode (see
also chapter on Setting the Fax Reception Mode, Page
39). The device will not receive faxes on its own. This set-
ting is useful, when you want to receive faxes via a modem
connected to a computer. You can start fax reception man-
ually, by pressing o.
Spaltenumbruch
Receive Faxes Silently
Silent Fax Reception
Set the number of rings 0 (see also chapter setting the
number of rings, page 37) and set the fax reception mode
to fax mode (see also chapter setting the fax reception
mode, page 39), in order to receive faxes without your
device ringing.
Setting Protected Fax
Reception
Deactivating Automatic Fax Printout
You can secure your fax reception with a code. In that case,
incoming faxes are not printed out, but rather are stored in
the fax memory. Only after entering a PIN code can you
print out these fax transmissions.
Entering the PIN Code
Entering the PIN Code
1 Press OK, 4033 and OK.
2 Enter a four-digit PIN code.
3 Confirm with OK.
Switching On and Off
1 Press OK, 4032 and OK.
2 Enter the four-digit PIN code.
3 Confirm with OK.
4 Use [ to select whether you would like to turn the
function on or off.
5 Confirm with OK.
Printing Out Fax Transmissions
1 Press OK, 4031 and OK.
2 Enter the four-digit PIN code.
3 Confirm with OK. The stored fax transmissions are
printed out and deleted from the memory.
Polling Faxes
Polling Faxes
With the fax polling function, you can retrieve faxes that
lie ready in the dialled device.
Polling Faxes Directly
1 Press OK, 42 and OK.
2 Enter the desired number using the numeric keypad or
select a saved entry.
3 Press o.
Time-Deferred Polling
1 Press OK, 42 and OK.
2 Enter the desired number using the numeric keypad or
select a saved entry.
3 Confirm with OK.
4 Enter the time, at which the document should be
polled, e.g. 14 00 for 2 pm.
5 Confirm with OK.
6 The device is now in standby mode. You can continue
to carry on telephone conversations or send other fax
transmissions during this time.
Deleting a Job SFL
Jobs
Printing the Jo b List
Introduction
All messages that have just been sent, that have been pre-
pared for polling or that are to be sent or polled at a later
time are present in the jobs list.
Display
Jobs appear in the display one-at-a-time. After the job
number and job status indicator, you will find the fax
number to which a fax is to be sent or from which it is to
be polled. Documents on the jobs list can fall into the fol-
lowing categories with regard to their status:
Jobs 1
TX—Time-Deferred Sending
Jobs 3
POL—Time-delayed Fax Polling
Jobs 4
TR.—Job in progress
CAUTION!
Message Memory Full!
If the message memory is full, no additional
messages can be received.
Notice
Delete Fax Messages Sent
If there are problems with printing out saved fax
messages, a service code is available (see also
chapter on using service codes , page 52).
Notice
Entering the PIN Code
If you have already saved a code, the device will
ask you to provide the old code first before you
can enter a new code.
Notice
Deleting a Job
To cancel a scheduled fax transmission, simply
delete the document from the jobs list (also see
chapter Jobs, page 30).
Notice
Help Button
You can also obtain a print jobs list by pressing
¨. Using [ select
COMMANDS. Confirm with
OK.
lpf-5120-5125-5135-manual-uk-int-253117544-b.book Seite 30 Mittwoch, 16. Dezember 2009 10:01 10