


26 Philips LPF 920 · 925 · 935 · 940
EN
10 Settings
Help 5 · Settings
Cursor Navigation 6
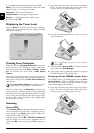
Energy Saving Mode
Energy Saving Mode
Your device switches into the energy saving mode by de-
fault. It is not necessary for you to set the device to this
mode. Whenever you receive a fax or if you would like to
print or make a copy, your device will automatically switch
back from its energy saving mode to its operating mode.
Selecting the Country
Setting the Cou ntry Correctly
1 Press OK, 11 and OK.
2 Use [ to select the country in which you are operat-
ing the device.
3 Confirm with OK.
Selecting the Language
1 Press OK, 12 and OK.
2 Use [ to select the desired display language.
3 Confirm with OK.
Entering the Date and Time
1 Press OK, 13 and OK.
2 Enter the date (two digits for each field), for example
31¦05¦25 for May 31th, 2025.
3 Enter the time, e.g. 14 00 for 2 pm.
4 Confirm with OK.
Entering Your Telephone
Number and Name
Header
Your name and number are added together with date, time
and page number at the top edge of each fax transmission
(= header).
Cursor Navigation 1
1 Press OK, 14 and OK.
2 Enter your number.
3 Confirm with OK.
4 Enter the name using the keys (A—Z).
5 Confirm with OK.
Locking the Device
Locking the D evice
With the locking function, you can prevent unauthorised
persons from using your device. You can lock either the en-
tire keyboard or the number pad of your device. Only after
entering of the correct code will it be possible to access
functions or enter numbers. The lock will turn itself on
again after each use of the device.
Entering the PIN Code
1 Press OK, 61 and OK.
2 Using [ select
LOCKING CODE.
3 Confirm with OK.
4 Enter a four-digit PIN code.
5 Confirm with OK.
6 Enter the code again for confirmation purposes.
7 Confirm with OK.
Locking the Keyboard
1 Press OK, 61 and OK.
2 Using [ select
LOCK KEYBD..
3 Confirm with OK.
4 Enter the four-digit PIN code.
5 Confirm with OK.
6 Use [ to select whether you would like to turn the
function on or off.
7 Confirm with OK.
Locking the Number Pad
1 Press OK, 61 and OK.
2 Using [ select
LOCK NUMBER.
3 Confirm with OK.
4 Enter the four-digit PIN code.
5 Confirm with OK.
6 Using [ select
ONLY DIRECT..
7 Confirm with OK.
Press ¨, 5 and OK to print a list of all settings of
your device.
You can move the cursor using [. Press C to return
to the previous menu level. Press j to close the
menu and return to the starting mode.
Always set the country in which you are operating
the machine. Otherwise, your machine is not adapt-
ed to the telephone network. If your country is not
included in the list, you must select a different setting
and use the correct telephone cable for the country.
Consult your retailer.
Enter capital letters by pressing and holding ú but-
ton. You can enter special characters using ½.
To insert special characters and symbols, press ;ü.
Press ûü to insert language specific special charac-
ters. Select with [. Confirm with OK.
You can move the cursor using [. Use C to delete
individual characters.
If you have already saved a code, the device will
ask you to provide the old code first before you
can enter a new code.
Note down your PIN code in a safe place. Should
you forget the PIN code, the device must be reset
to factory settings, in order to be able to access it
again. All personal settings will be deleted.