


SPX Operation Manual 8
Version 1.1: 2010 © 2010 Philips Selecon All Rights Reserved
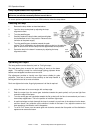
Shutter Lock
The shutter lock is used to fix the shutters in position
after they have been focused. To lock, slide the lever
to the closed position. To unlock, slide the lever to the
unlocked position.
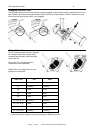
Rotatable Shutters
The shutter and reflector assembly can be rotated
to position the shutters for the best cut, or to move
the focus knobs into an optimum operating
position.
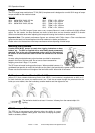
1. Check that the front accessory cover is closed,
securing the colour frame. Ensure any pattern
holders or iris/ accessories are secured in the
accessory slots (refer above)
2. Loosen the top shutter and reflector assembly screw clamp
3. Rotate the shutter and reflector assembly to the required position
4. Tighten the shutter and reflector assembly screw clamp.
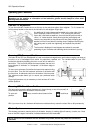
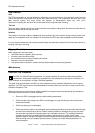
Accessory Mounting Positions
The SPX range provides good image projection right across the beam.
NOTE: The SPX range has two different pattern holders.
SPXGHB For 'B' size steel patterns
SPXGHGB For “B” size glass patterns
The SPX provides for mounting 2 pattern holders.
The front accessory slot will house:
Glass pattern holder (code SPXGHB)
An adjustable iris (code 20IRIS)
A motorised gobo rotator (e.g. Rosco/Apollo)
The rear slot will house a Philips Selecon steel pattern holder
(order code: SPXGHB).
Refer to website for a list of compatible third party accessories.
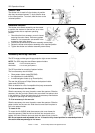
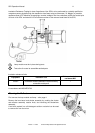
To fit an accessory in the front slot
Slide the accessory slot cover forward to reveal the aperture. Slide the
accessory into the front slot. Slide the slot cover back into place to lock
in the accessory. Follow the instructions of the accessory manufacturer
in regards to operating and safety procedures.
To fit an accessory in the rear slot
Slide the accessory slot cover forward to reveal the aperture. Slide the
pattern holder into the rear slot. Slide the slot cover back into place to
lock in the pattern holder.
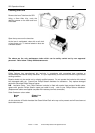
To insert an Iris
To mount the Iris (20IRIS) slide the accessory slot cover forward to
reveal the aperture. Slide the iris into the front slot and push to the
bottom of the slot. Slide the slot cover back into place to lock in the iris.
NB: Do not operate and adjustable iris in a ½ closed to fully closed position for extended periods of
time as the heat may damage to iris leaves.