


4
Unpacking and Setup: (continued)
The unit is shipped with the modeling lamp and flashtube not installed. While installing
the modeling lamp and flashtube (with glove or clean cloth to protect the hand) be sure
they are properly inserted and tight to avoid arcing and failure of the socket contacts
during operation. Do not touch the glass tubes with bare hands, as normal body oils will
shorten the bulb’s life. Always use a clean cloth or wear gloves to protect your hand
from glass breakage and heat.
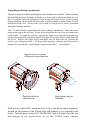
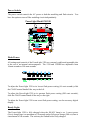
The 7 1/2 inch reflector is attached by the “quick-change” mechanism. Three tabs on the
unit grip the ring on the reflector. Finger levers located on the top of the unit control two
of these tabs. To mount the reflector, squeeze the finger levers towards each other and
tilt the reflector past the stationary top-tab, then past the two tabs that are controlled with
the levers. Release the finger levers and make sure all three tabs are securing the
reflector (see illustration below.) All PowerLight accessory reflectors and soft boxes are
designed for use with this “quick-change” system or onto this 7 _ inch reflector.
Squeeze levers to mount
reflector in locked position.
Punch out hole for Professional plug-in
umbrella rod. flashtube.
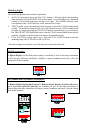
With power switch OFF, attach the line cord to the power-input connector,
located on the bottom of the PowerLight, and connect it to a grounded wall
outlet. Turn the power switch ON. The READY light will light when the unit
has charged to the power level set by the FLASH power control.