


- 9 -
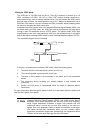
1. Never stack unit more than eight sets high if freestanding.
2. Do not place objects on top of any unit or stack.
3. Do not obstruct any vents at the sides of the case.
Rack-mount Installation
The switch may standalone, or may be mounted in a standard 19-inch equipment rack.
Rack mounting produces an orderly installation when you have a number of related
network devices. The switch is supplied with rack mounting brackets and screws. These
are used for rack mounting the unit.
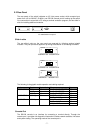
Rack Mounting the Switch in the 19-inch rack:
1. Disconnect all cables from the switch before continuing.
2. Place the unit the right way up on a hard, flat surface with the front facing toward
you.
3. Locate a mounting bracket over the mounting holes on one side of the unit.
4. Insert the screws and fully tighten with a suitable screwdriver.
5. Repeat the two previous steps for the other side of the unit.
6. Insert the unit into the 19" rack and secure with suitable screws (not provided).
7. Reconnect all cables.
Installing Network Cables
Station Connections -
Refer to the wiring statement of the previous section; connect each station with correct
type of cables.
Switch-to-Switch Connections –
In making a switch-to-switch connection, use Gigabit ports to connect another switch or
backbone is strongly recommended. The Gigabit ports provide the fat pipe to the server or
backbone connectivity for boosting the total system performance. Refer to the wiring
statement of the previous section; connect each station to the switch with correct type of
cables.
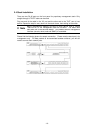
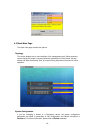
Module Installation
The two slide-in slots on the rear panel are purposed for installing optional modules. They
can be used as a network backbone or connect to a server. Follow the steps as described
to install a module:
1. Power off the switch.
2. Removing the two screws on the face plate of slide-in slot with a flat-head
screwdriver.
3. Push the module gently into the slot along the slide tracks.
4. Ensuring that it firmly engages with the connector then tighten the screws to secure
the module.
ëNote
The slide-
in slots are not hot swappable, power off the switch before
installing modules.