


VIP User’s Guide
Installing VIP
5
Chapter 2 Installing VIP
This chapter gives information on how to install VIP.
2.1 Network Requirements
For VIP successfully operate in your network, your network must meet the following requirements:
1. A working 10/100 Base-T Ethernet. VIP connects to Internet via an Ethernet LAN.
2. IP network that supports gateway, and subnet mask. You’ll need one static IP address to as-
sign VIP.
2.2 Installing VIP
VIP can be used in a desktop configuration. Ensure that VIP is placed in a clean, well-ventilated,
and vibration-free environment.
When VIP is placed on a desktop, be certain that the unit is placed on a sturdy, flat surface, near a
grounded power outlet. At least three inches of clearance must be provided on both sides of VIP
for well ventilation.
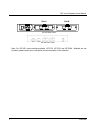
2.3 Connecting to the telephony devices
VIP-050 supports three types of TIM. One is FXO, FXS and the other is E&M. Each module has
four ports for connecting to telephony devices. VIP-450 equips two FXO and two FXS interfaces to
have the great flexibility of PBX connection (FXO), and telephone or FAX machine connection
(FXS).
VIP-FXO module is designed for connecting to PBXs (extension line) or central office switches (CO
line).
VIP-FXS module is designed for connecting to analog telephone sets or G3 fax machines.
Connecting the telephony devices to the appropriate RJ11 ports on the TIM.
Warning:
connection of incorrect telephony devices to the ports on the TIM can cause permanent
damage to the TIM and/or VIP.
2.4 Connecting to the Network
The RJ45 network port on the front panel supports 10/100 Mbps half-duplex connection to Ethernet
Network. You can use either category 3 or 5 straight-through UTP cable for 10 Mbps connections,
but use Category 5 for 100 Mbps connections. To connect to Ethernet, insert one end of the
Ethernet cable to the RJ45 port on the front panel of VIP and other end of the cable to an Ethernet
switching hub or repeater hub.