


12
Installation
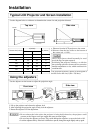
Typical LCD Projector and Screen Installation
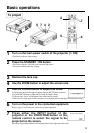
Using the adjusters
a. Distance from the LCD projector to the screen
b.Distance from the lens center to the bottom of
the screen (a,b : +/-10%).
The projection distances shown in the diagram to
the left are for full size (1,024 x 768 dots).
The LCD projector should normally be used
level (the legs can point upward).
Positioning the projector sideways, or with the
lens pointing upward or downward can cause the
internal temperature to rise, which could result in
a malfunction.
Use the diagram below as reference to determine the screen size and projection distnace.
• Do not release the locks unless the projector is being held; otherwise, the projector could
overturn or the fingers could get caught and cause personal injury.
• Do not force the adjusters to rotate. This could damage the adjusters or cause the lock to fail.
• Lock the adjusters firmly. If the lock is difficult to operate, change the angle slightly and try again.
Use the adjusters on the bottom to adjust the projection angle.
1. Lift up the projector and release the adjuster lock.
2. After adjusting the projection angle, firmly lock the adjusters.
3. Rotate the adjusters for fine adjustment.
Screen
Top view
Side view
Lens center
Front view
Adjuster
Side view
Variable within the range of approximately 0° - 9°
Screen size (inches)
Minimum
a
Maximum
b (inches)
40 55 73 1
60 85 114 2
80 114 151 2
100 144 191 3
120 176 231 3
150 220 282 4
200 291 386 6
a (inches)