


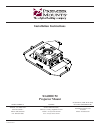
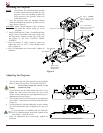


XL6000CM
Installation Instructions Page 5
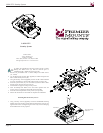
Figure 4
NOTE: Please follow the installation sheet included
with the specific mounting bracket for your
projector. Once the mounting bracket has
been secured to the projector, follow the
instructions below.
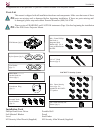
1. Raise the projector (with the mounting bracket
attached) and hook the projector bracket over the
hinge screws (Figure 4).
CAUTION: Make sure the bracket is fully secured to
the Base Box before letting go of the
projector.
2. Loosely install the two (2) M6 x 12mm Phillips Head
Hinge screws, flat washers and nylon spacers into
the hinge holes, located on each side of the base
box (Figure 4). DO NOT TIGHTEN THESE
SCREWS!
3. Once the mount is safely attached, insert and
tighten the four (4) M6 x 12mm Phillips Head
Screw (Figure 4).
4. Once all adjustments have been made, tighten all
hardware.
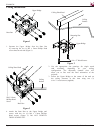
Attaching the Projector
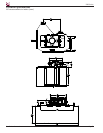
Adjusting the Projector
1. You can adjust the roll of the projector by loosening the
three (3) front and rear M6 x 12mm screws (Figure 5).
Do not fully loosen the screws, as the
mount may drop.
2. Set the desired roll and then tighten the screws. First
tighten the center screws and work your way to the
outside screws, making any final adjustments prior to
tightening the last two screws.
3. You can adjust the tilt of the projector by loosening the
two (2) M6 x 12mm screws on each side of the Base Box
(Figure 5).
4. Set the desired tilt and then tighten the screws, making
any final adjustments prior to tightening the last two
screws.
If your projector is not holding the tilt, install the
four (4) internal/external tooth lock washers to the
four (4) M6 x 12mm tilt screws.
5. Once all adjustments have been made, tighten all
hardware.
Set Screw (
Use set screw only
when attaching to
pipe).
NOTE:
Projector
Bracket
M6 x 12mm Phillips
Head Screws (Attach after
the bracket has been
mounted and tightened)
Hinge Screw Hole
Nylon Spacer
Flat Washer
M6 x 12mm
Phillips Head
Hinge Screw
Roll
Tilt