


10
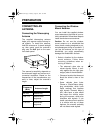
4. Attach the scanner to the mount-
ing bracket using the supplied
mounting knobs.
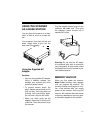
Connecting Power from Your
Vehicle’s Battery
Depending on if your scanner is per-
manently installed in your vehicle, you
can power it using either the DC pow-
er cord or the DC cigarette-lighter
power cable (both supplied).
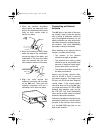
Follow these steps to connect the sup-
plied DC power cord.
1. Connect the power cord’s black
wire to your vehicle battery’s neg-
ative (
–
) terminal or to a metal part
of the vehicle’s frame that is not
insulated from the frame by a
plastic part.
2. Connect the power cord’s red wire
(with in-line fuse) to a source of
voltage that turns on and off with
the ignition switch, such as a
spare accessory terminal in your
vehicle’s fuse box.
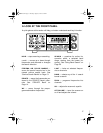
3. Insert the power cord’s barrel plug
into the
DC 13.8V
jack on the back
of the scanner.
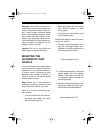
To connect the supplied DC cigarette-
lighter power cord, insert its barrel
plug into the
DC 13.8V
jack on the back
of the scanner, then plug the power
cord into your vehicle’s cigarette-
lighter socket.
Cautions:
• Unplug the power cord from your
vehicle’s cigarette-lighter socket
when you turn off the ignition. This
prevents vehicle battery drain if
you leave the scanner on when
you turn off the ignition.
• Always unplug the power cord
from your vehicle’s cigarette-
lighter socket before you unplug
its barrel plug from the scanner.
Note:
If the scanner does not operate
when you turn it on, remove the power
cord from your vehicle’s cigarette-
lighter socket and check the socket for
debris. Also, check the fuse in the
power cord you are using (see “Re-
placing the Fuses” on Page 35) and
your vehicle’s fuse block.
(add corrected illus F8)
(add corrected illus F9. Add
callouts ‘Positive (+)’ and
‘Negative (-)’ to respective
wires)
(add corrected illus F10)
20-147.fm Page 10 Tuesday, August 3, 1999 3:23 PM