


10
User Manual
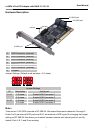
e-SATA 4 Port PCI Adaptor with RAID RC-209-EX
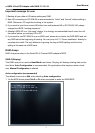
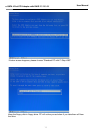
4. Select SPARE DRIVE then press Enter.
5. Select the replacement drive then press Enter.
6. When asked Are You Sure(Y/N)?, press Y to confirm.
7. Press Ctrl+E to exit.
8. When asked Are you sure to exit(Y/N)?, press Y to exit.
RAID 0+1 (Mirroring+Striping)
This RAID array to be used on New/Blank hard drives, do not use existing hard drive(s) with data.
To create a RAID 0+1 set at least four hard drives are required.
Auto configuration (recommended)
The default chunk size is 64k when selecting Auto configuration.
1. As the BIOS boots press Ctrl+S or F4 when prompted to enter the RAID BIOS.
2. At the next screen select Create RAID Set, then press Enter.
3. Select RAID10, then press Enter.
4. Select Auto configuration, then press Enter.
5. Input the RAID size, press Enter.
6. When asked Are You Sure(Y/N)?, press Y to accept.
7. Press Ctrl+E to exit the BIOS.
8. When asked Are you sure to exit(Y/N)?, press Y to exit and reboot.
9. Continue with FDISK and FORMAT steps as if you were installing a conventional hard drive.
Manual configuration
1. As the BIOS boots press Ctrl+S or F4 when prompted to enter the RAID BIOS.
2. At the next screen select Create RAID Set, then press Enter.
3. Select RAID10, then press Enter.
4. Select the number of drives then press Enter.
5. Select Manual configuration then press Enter.
6. Select chunk size from 8k, 16k, 32k, 64k or 128k, then press Enter.
7. Select the first drive, press Enter.
8. Select the second drive, press Enter.
9. Select the third drive, press Enter.
10. Select the fourth drive, press Enter.
11. Select Create without data copy then press Enter.
12. Input the RAID size, press Enter.
13. When asked Are You Sure(Y/N)?, press Y to accept.
14. Press Ctrl+E to exit the BIOS.
15. When asked Are you sure to exit(Y/N)?, press Y to exit and reboot.
16. Continue with FDISK and FORMAT steps as if you were installing a conventional hard drive.