


34 WebSTAR Model DPX213 VoIP DOCSIS Cable Modem User's Guide 4001231 Rev A
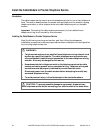
Install the Cable Modem to Provide Telephone Service, Continued
Installing the Cable Modem
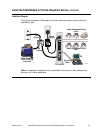
Follow these steps for proper cable modem installation.
1. Connect a telephone, fax machine, or analog modem to each of the
appropriate RJ-11 ports on the cable modem.
Notes:
• The cable modem provides one line of telephone service on each of the RJ-
11 connectors.
• Service must be set up and enabled by the cable telephone service
provider.
• The two center conductors on the RJ-11 connector provide electrical
connections to directly attached telephone devices or to a permanently
installed in-home telephone wiring network.
• The use of telephones that require electrical connections to other RJ-11
pins requires an adapter.
2. After all telephone connections are complete, insert the AC power adapter
cord into the DC power connector on the back of the cable modem, and then
plug the power adapter into an AC power source.
3. Connect the active RF coaxial cable to the CABLE IN connector on the back of
the cable modem.
Note: Use an optional cable signal splitter to add a TV, a DHCT or set-top
converter, or a VCR.
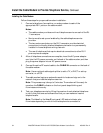
4. The cable modem begins an automatic search to locate and sign on to the
network that provides the telephone service.
Note: This process may take up to 5 minutes. The modem will be ready for
use when the CABLE indicator on the front panel stops blinking and
illuminates continuously.
5. Test your telephone service by lifting the receiver of each attached telephone
to verify that dial tone can be heard and that you can make and receive
telephone calls.
Note: The Line 1 or the Line 2 front panel LED status indicator also
illuminates depending on which line the telephone is connected to.