


Attaching cables
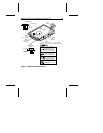
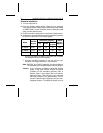
Refer to Figure 1 on page 3 for the locations of the connectors.
1. Connect the remote LED (optional).
2. Attach the power cable. Attach one of the cables from the
power supply to the power connector on the drive.
Caution. The cable and connector are designed to mate. Do not
force a connection. Improper alignment may damage
your drive.
3. Attach the interface cable. The edge-stripe on the interface
cable for the drive is used to denote pin 1. The cable length
must be no longer than 18 inches.
Caution. Cable misalignment can result in damage to the com-
puter and the drive. Ribbon cables are delicate—be
careful not to crimp or strain them.
Installing one drive with a standard ATA 40-pin interface cable:
Attach one end of the cable to the drive’s 40-pin ATA interface
connector. Align the cable’s edge-stripe with pin 1 of the drive
shown in Figure 1. Attach the other end of the cable to the host
adapter card or to the hard drive connector located on the
motherboard. Align the cable’s edge-stripe with pin 1 (see your
system user’s guide or host adapter user’s guide).
Installing two drives with an ATA interface cable:
You need an interface cable designed for two drives. Attach a
cable connector to each drive’s 40-pin ATA interface connec-
tor. Align the cable’s edge-stripe with pin 1 of the drive shown
in Figure 1. Attach the other end of the cable to the host
adapter card or to the hard drive connector located on the
motherboard. Align the cable’s edge-stripe with pin 1 (see your
system user’s guide or host adapter user’s guide). You can
attach the drives in any order on the cable.
Medalist XE Family Installation Guide, Rev. A 5