Medalist 17242, 13032, 10232, 8422 and 4312, Rev. A 17
2.0 Drive mounting and configuration
2.1 Handling and static-discharge precautions
After unpacking, and before installation, the drive may be exposed to
potential handling and electrostatic discharge (ESD) hazards. Observe the
following standard handling and static-discharge precautions:
Caution:
•
Keep the drive in its static-shielded bag until you are ready to complete
the installation. Do not attach any cables to the drive while it is in its
static-shielded bag.
•
Before handling the drive, put on a grounded wrist strap, or ground
yourself frequently by touching the metal chassis of a computer that
is plugged into a grounded outlet. Wear a grounded wrist strap
throughout the entire installation procedure.
•
Handle the drive by its edges or frame
only
.
•
The drive is extremely fragile—handle it with care. Do not press down
on the drive top cover.
•
Always rest the drive on a padded, antistatic surface until you mount
it in the computer.
•
Do not touch the connector pins or the printed circuit board.
•
Do not remove the factory-installed labels from the drive or cover them
with additional labels. Removal voids the warranty. Some factory-
installed labels contain information needed to service the drive. Other
labels are used to seal out dirt and contamination.
2.2 Jumper settings
2.2.1 Master/slave configuration
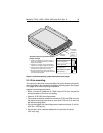
You must establish a master/slave relationship between two drives that
are attached to a single AT bus. You can configure a drive as a master
or slave by setting the master/slave jumpers, shown in Figure 2 on page
19.
These drives support master/slave configuration using the cable select
option. This requires a special daisy-chain cable that grounds pin 28
(CSEL) on one of its two drive connectors. If you attach the drive to the
grounded CSEL connector, it is a master. If you attach the drive to the
ungrounded CSEL connector, it is a slave. To use this option, the host
system and both drives must support cable select, and both drives must


