


13
SETTING UP BUTTON MANAGER
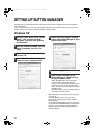
Windows 98/Me/2000
1
click the "Start" button, select
"Settings", and then click "Control
Panel".
2
Double-click the "Scanners and Cameras"
icon.
3
Select "AR-XXXX", and click the
"Properties" button.
In Windows Me, right click "AR-XXXX" and click
"Properties" in the menu that appears.
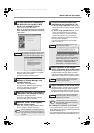
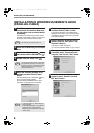
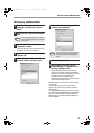
4
In the "Properties" screen, click the
"Events" tab.
5
Select "ScanMenu SC1" from the
"Scanner events" pull-down menu.
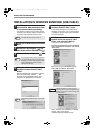
6
Select "Sharp Button Manager A" in
"Send to this application".
7
Click the "Apply" button.
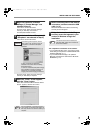
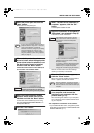
8
Repeat Steps 5 through 7 to link
Button Manager to "ScanMenu SC2"
through "ScanMenu SC6".
Select "ScanMenu SC2" from the "Scanner
events" pull-down menu. Select "Sharp Button
Manager A" in "Send to this application" and click
the "Apply" button. Do the same for each
ScanMenu through "ScanMenu SC6".
When the settings have been completed, click the
"OK" button to close the screen.
Button Manager is now linked to the scan menu keys
(1 through 6).
The scan settings for each of scan menu keys 1
through 6 can be changed in the setting window of
Button Manager.
For the factory default settings of the scan menu keys,
see "USING THE SCANNER MODE" in the Operation
Manual. For the procedures for configuring Button
Manager settings, see "Button Manager Settings" in
the Online Manual.
If the "Scanners and Cameras" icon does not
appear in Windows Me, click "view all Control
Panel options".
Note
If other applications are shown, deselect the
checkboxes for the other applications and
leave only the Button Manager checkbox
selected.
Note
!install_ar160205.book 13 ページ 2003年5月26日 月曜日 午後12時9分