


1-4
BEFORE USING THE MACHINE
Contents
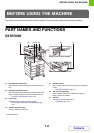
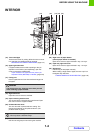
INTERIOR
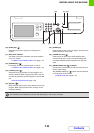
(15) Toner cartridges
These contain toner for printing. When the toner runs out
in a cartridge, the cartridge must be replaced.
REPLACING THE TONER CARTRIDGES (page 1-51)
(16) Upper right side cover
If a paper misfeed occurs while outputting to the job
separator or the finisher (sold separately), open this
cover to remove the misfed paper.
Paper misfeed in the upper exit area (when a job
separator/finisher (MX-FN23) is installed) (page 8-10)
(17) Fusing unit
Heat is applied here to fuse the transferred image onto
the paper.
(18) Right side cover
Open this cover to remove a misfeed.
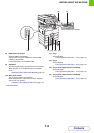
(19) Paper reversing section cover
This is used when 2-sided printing is performed. Open
this cover to remove a paper misfeed.
(20) Photoconductive drum
This is a drum with a photoconductor coating. The
images are produced on this photoconductor. (The
photoconductor is green.)
(21) Handle
Pull this out and grasp it when moving the machine.
(22) Right cover of paper drawer
(when a paper drawer is installed)
Open this to remove a paper misfeed in tray 3 or tray 4.
(23) Paper tray right side cover
Open this to remove a paper misfeed in tray 1 or tray 2.
(24) Bypass tray
Use this tray to feed paper manually.
When loading a large sheet of paper, be sure to pull out
the bypass tray extension.
LOADING PAPER IN THE BYPASS TRAY (page 1-33)
(15) (16) (17) (18)
(23) (24)(22)(21)(20)
(19)
Caution
The fusing unit is hot. Take care not to burn yourself
when removing a paper misfeed.
Do not touch or damage the photoconductive drum.
This may cause a defective image.