


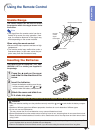
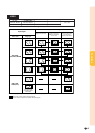

-23
Projection
Using the Adjustment
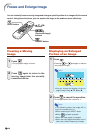
Feet
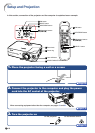
The height of the projector can be adjusted
using the adjustment feet at the front and rear
of the projector.
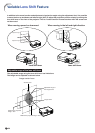
When the screen is in a higher position than
the projector, the projection image can be
made higher by adjusting the projector.
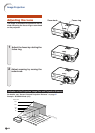
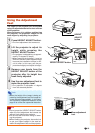
1 Press HEIGHT ADJUST button.
•The front adjustment foot comes out.
2 Lift the projector to adjust its
height while pressing the
HEIGHT ADJUST button.
•The projector is adjustable up to approxi-
mately 12 degrees (5 steps).
•When lowering the projector, it may be
difficult to move the front adjustment foot
because the installation surface is diffi-
cult to slide. In this case, pull the pro-
jector back slightly and adjust its height.
3 Remove your hands from the
HEIGHT ADJUST button of the
projector after its height has
been finely adjusted.
4 Use the rear adjustment foot to
make the projector level.
•The projector is adjustable ±1 degree
from the standard position.
Note
•When the height of the image is being ad-
justed by the adjustment feet, the image be-
comes distorted trapezoidally. In this case,
see “Correcting Trapezoidal Distortion” on the
page 20 to correct the trapezoidal distortion.
Info
•Do not press the HEIGHT ADJUST button
when the front adjustment foot comes out
without firmly holding the projector.
•Do not hold the lens when lifting or lower-
ing the projector.
•When lowering the projector, be careful not
to get your fingers caught in the area be-
tween the adjustment foot and the projector.
HEIGHT
ADJUST
button
HEIGHT ADJUST button
Front adjustment
foot
Rear adjustment
foot
HEIGHT ADJUST button