


97
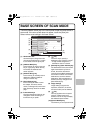
BASE SCREEN OF SCAN MODE
Touch the [IMAGE SEND] key in the touch panel to open the base screen of
scan mode. If the scan screen does not appear, touch the [Scan] tab.
Select various scan settings in the base screen.
(1) Send mode tabs
Use these keys to change the mode
of the image send function. To switch
to scan mode, touch the [Scan] tab.
(2) [Address Book] key
Touch this key to use a one-touch
key or a group key. When the key
is touched, the address book
screen appears.
(3) [Address Entry] key
Touch this key to manually enter a
destination address instead of
using a one-touch key.
(4) [Send Settings] key
Touch this key to select or enter
the subject, file name, sender
name, or message text, which have
been previously stored in the Web
page.
(5) Customized keys
The keys that appear here can be
changed to show the settings or
functions that you prefer.
(6) key
Touch this key to specify a
destination using a search number
*
.
* 3-digit number assigned to a
destination when it is stored.
(7)
[Resend] key / [Next Address] key
The destinations of the most recent
eight transmissions by Scan to
E-mail, fax and/or Internet fax
(including Direct SMTP addresses)
are stored. To select one of these
destinations, touch the desired
destination. After a destination is
selected, this key changes to the
[Next Address] key.
(8) Image settings
Image settings (original size,
exposure, resolution, file format,
and color mode) can be selected.
(9) key
This key appears when a special
mode or 2-sided scanning is
selected. Touch the key to display
the selected special modes.
(10) [Special Modes] key
Touch this key to use a special mode.
Auto
Auto
File
Quick File
Address Review
Send Settings
Address Entry
Address Book
USB Mem. ScanFaxInternet Fax PC Scan
Resend
Special Modes
Color Mode
File Format
PDF
PDF
Resolution
Exposure
Original
Scan:
Scan
Send:
200X200dpi
Ready to send.
8½x11
Mono2
(1)
(5)
(6)
(2)
(3)
(4)
(7)
(8)
(9)
(10)
mxb401_us_qck.book 97 ページ 2009年1月8日 木曜日 午後2時1分