


Appendix
-73
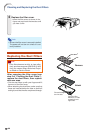
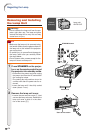
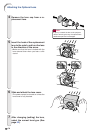
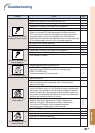
3 Remove the lamp unit.
• Loosen the securing screws (two for
each lamp) from the lamp unit. Hold the
lamp unit by the handle and pull it in the
direction of the arrow. At this time, keep
the lamp unit horizontal and do not tilt it.
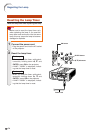
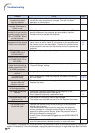
4 Insert the new lamp unit.
• Fully insert the lamp unit into the lamp
unit compartment. Press the handles
back to their positions, and tighten the
securing screws.
5 Replace the lamp unit cover.
• Slide the lamp unit cover to the position
where the indicator “
||
||
|” of the lamp cover
unit and the “
\\
\\
\” of the projector will meet
to close the cover. Then tighten the user
service screw to secure the lamp unit
cover.
Info
• If the lamp unit and lamp unit cover are not
correctly installed, the power will not turn
on, even if the power cord is connected to
the projector.
Securing screws
Handle
AN-P610LP
Compartment
for
Lamp 1
Compartment
for
Lamp 2
User service screw