


13
Introduction
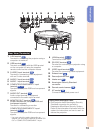
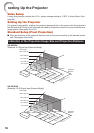
1312 14 15 16 17
12345 6 7 8 9
10
11
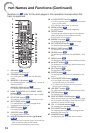
1312 14 15 16 17
12345 6 7 8 9
10
11
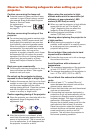
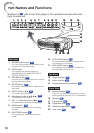
Rear View (Terminals)
1 LAN terminal
26
Terminal for controlling the projector using a
computer via network.
2 USB terminal
42
Terminal connecting with the USB terminal
on the computer for using the supplied
remote control as the computer mouse.
3 S-VIDEO input terminal
23
Terminal for connecting video equipment
with an S-video terminal.
4 AUDIO 2 input terminal
24
5 AUDIO 1 input terminal
24
6 COMPUTER/COMPONENT 1 input
terminal
22, 23
Terminal for computer RGB and component
signals.
7 AUDIO OUT terminal
24
Audio output terminal of equipment
connected to the audio input terminal.
8 MONITOR OUT* terminal
24
(Output terminal for computer RGB and
component signals)
Terminal for connecting a monitor.
COMPUTER/COMPONENT 2* input
terminal
22, 23
Terminal for computer RGB and component
signals.
* You must switch the setting depending on
whether you are using the terminal for MONITOR
OUT or COMPUTER/COMPONENT 2 input.
9 HDMI terminal
22, 23
Terminal for HDMI input.
10 RS-232C terminal
25
Terminal for controlling the projector using
a computer.
11 VIDEO input terminal
23
Terminal for connecting video equipment.
12 Exhaust vent
69
13 Rear adjustment foot
29
14 Intake vent
69
15 Kensington Security Standard
connector
16 Remote control sensor
15
17 AC socket
26
Connect the supplied power cord.
Using the Kensington Lock
This projector has a Kensington Security
Standard connector for use with a
Kensington MicroSaver Security System.
Refer to the information that came with the
system for instructions on how to use it to
secure the projector.
•