


54
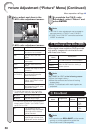
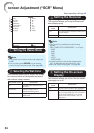
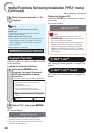
Resize
Wall Color
Overscan
OSD Display
Closed Caption
English
Logo
Off
Normal
Front
On
Off
On
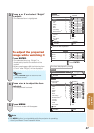
SEL./ADJ.
RETURN
ENTER
END
Background
PRJ Mode
Language
Picture Audio SIG SCR PRJ Net.
1
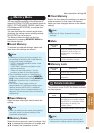
Setting the Resize Mode
For details of the Resize mode, see pages 36
to 39.
You can also press RESIZE on the remote
control to set the resize mode. (See page
36.)
•
•
Note
2
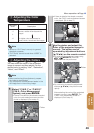
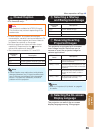
Selecting the Wall Color
This function allows you to project the image
to a colored (white or dark green) surface or
wall without using a screen.
Selectable items Description
Off The Wall Color function is not
activated.
Blackboard
Projects images onto a
blackboard (dark green).
Whiteboard
Projects images onto a
whiteboard.
3
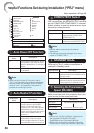
Setting the Overscan
This function allows you to set the overscan
area (display area).
Selectable
items
Description
On The input area is displayed without the
screen edges.
Off The whole input area is displayed.
This function is available for the following
signals.
With COMPUTER/COMPONENT 1 or 2 input:
- 480P
- 540P
- 576P
- 720P
- 1035I
- 1080I/1080P
If noise appears at the screen edges when
“Off” is selected, set the function to “On”.
Also see “About Copyrights” on page
39.
•
•
•
Note
4
Setting the On-screen
Display
This function allows you to turn the on-screen
messages on or off.
Selectable
items
Description
On All On-screen Displays are displayed.
Off
INPUT/VOLUME/AV MUTE/FREEZE/
AUTO SYNC/RESIZE/PICTURE MODE/
ECO+QUIET/MAGNIFY/ “An invalid
button has been pressed.” are not
displayed.
Screen Adjustment (“SCR” Menu)
Menu operation n Page 46