


MAINTENANCE INSTRUCTIONS
4.10
Annual maintenance for the remote controls
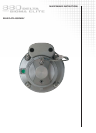
Tools required for complete maintenance of Models 692, 693, 664 remote controls,
compatible with Models 880, 660 and 460 exposure devices:
●
11
/
16in open-end wrench for the control conduit swage fittings.
●
1
/
2in open end wrench for the 5-16 control crank handle bolt.
●
Slot screwdriver for the 10-32 remote control crank screws.
●
3
/
8in wrench for the 10-32 control crank stop nuts.
●
0.050in Allen wrench for the 4-40 set screw on the odometer knob on the Model 693
and Model 664 remote control units.
●
Control cable run-off prevention (stop) spring removal tool if required.
●
Model 550 connector NO GO gauge for wear check of the control cable connector.
●
X7 magnification glass for control cable inspection if required.
●
Micrometer for measurement of control cable diameter.
Materials required for complete maintenance of Models 692, 693, 664 remote controls:
●
Clean solvent: fresh mineral spirits recommended for cleaning and degreasing remote
control mechanism, control cable and cleaning the control conduits internally.
(Follow manufacturers safety precautions for use, handling, storage and disposal.)
●
Large pan for cleaning and degreasing the control crank assembly and control cable.
●
Clean lint-free rags and detergent to clean the exterior of the control conduits.
●
Mil-Spec grease, MIL-G-23827B or C, MIL-PRF-23827C (or equivalent radiation
resistant grease) for lubricating the control cable and control crank mechanism.
●
Stainless steel, brass or synthetic bristle brush to clean control crank parts and the
control cable.
●
Compressed air source and hand nozzle to blow dry the control cable internal Teflon™
liner of the remote control conduits after cleaning.
●
3M™ yellow polyvinyl tape (or black polyvinyl electrical tape) for repair of cuts in remote
control conduits.
●
Safety glasses.
Remote control maintenance requirements
1 Disconnect the remote control unit from the exposure device.
2 Straighten out the remote control housings on a work surface, then remove the control
cable from the remote control conduits (661 safety connector side) until it stops (a stop
spring on the end of the control cable). Rubber gloves are recommended for this operation.
Do not use excessive force during removal of the control cable. During removal of the
control cable, it should be coiled in loops no less than a 12in (305mm) diameter and secure.
3 Disconnect the remote control conduit fitting from the control crank using the
11
/
16in
open-end wrench. Remove the stop spring from the end of the control cable and pass the
control cable through the crank gear to completely disengage. Label the remote control
conduits for proper assembly after the servicing.
4 Pull the remaining control cable through the 661 safety connector and secure.
5 Using the
11
/
16in open-end wrench, remove both remote control conduits from the 661
safety connector and the control crank.
6 Thoroughly clean the control cable using a brush in a degreaser bath. Use compressed air
to blow off residual solvent after the degreasing operation. Be sure to follow the solvent
manufacturer's safety recommendations.