


8 Installing an X-Port 20 Switch in a 2000i 99-00539-00 Rev B0
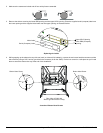
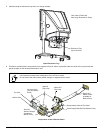
8. Swing the electronics tray back to its original position, and insert the two button head screws that you removed earlier.
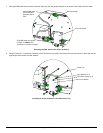
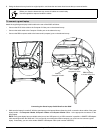
Attach the supplied guest laptop cable bundle to the rear of the 2000i as follows:
• Connect the HD15 video cable to the Computer 2 Video port on the electronics tray.
• Connect the audio cable to the Computer 2 Audio port on the electronics tray.
• Connect the DB9 computer cable to the lower serial (computer) port on the electronics tray.
Connecting the Guest Laptop Cable Bundle to the 2000i
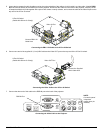
1. Make sure the laptop is turned off. With the guest laptop on the laptop/videoconferencing shelf, connect the three cables of the guest
laptop bundle – the Computer 2 Audio, Computer 2 Video and Computer 2 Serial cables – to the appropriate connectors on the
guest laptop.
NOTE: If the guest laptop has no available serial port or has USB ports only, a USB connection is possible. A SMART USB adapter
cable was shipped with the 2000i and, if it is not used for connecting the resident computer, you could use it to connect a guest
laptop. If necessary, you can order another SMART USB adapter cable (order number USB-ADP).
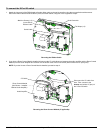
IMPORTANT
Before you close the electronics tray, ensure all cables are routed neatly.
Use the supplied tie wraps to bundle the cables.
To connect a guest laptop
A
u
d
i
o
O
u
t
A
u
x
i
l
i
a
r
y
A
u
d
i
o
I
n
C
o
m
p
u
t
e
r
2
A
u
d
i
o
HD15 Video to
Computer 2 Video
Audio to
Computer 2 Audio
DB9 Computer
to Lower Serial Port