SonicWALL NSA E6500 Getting Started Guide Page 27
Connecting to Your Network
The SonicWALL NSA E6500 ships with the internal DHCP
server active on the LAN port. However, if a DHCP server is
already active on your LAN, the SonicWALL will disable its own
DHCP server to prevent conflicts.
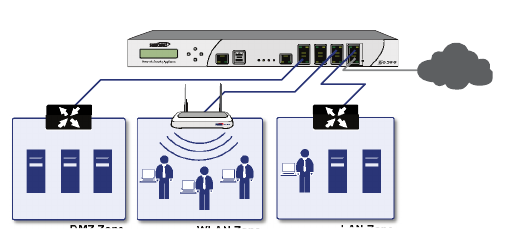
As shown in the illustration on this page, ports X1 and X0 are
preconfigured as WAN and LAN respectively. The remaining
ports (X2-X7) can be configured to meet the needs of your
network. In the graphical example on this page, the zones are:
X1: WAN, X0: LAN, X2: WLAN, X7: DMZ.
Refer to the SonicOS Enhanced Administrator’s Guide for
advanced configuration deployments.
Testing Your Connection
1. After you exit the Setup Wizard, the login page reappears.
Log back into the Management Interface and verify your IP
and WAN connection.
2. Ping a site outside of your local network, such as
<http://www.sonicwall.com>.
3. Open another Web browser and navigate to:
<http://www.sonicwall.com>.
If you can view the SonicWALL home page, you have
configured your SonicWALL NSA E6500 correctly.
If you cannot view the SonicWALL home page, renew your
management station DHCP address.
4. If you still cannot view a Web page, try one of these
solutions:
• Restart your Management Station to accept new
network settings from the DHCP server in the
SonicWALL security appliance.
• Restart your Internet Router to communicate with
the DHCP Client in the SonicWALL security appliance.
3ONIC0OINT
/$1=RQH
6RQLF:$//16$(
'0==RQH
:/$1=RQH
;
;
;
;
,QWHUQHW
NSA_E6500_GSG.book Page 27 Wednesday, June 17, 2009 7:16 PM


