


38
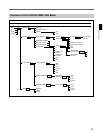
Chapter 2 Menu
Notes
• Even when selecting AUTO, also select NTSC
(SETUP 7.5 or 0), PAL (S or D), and PAL-M (S or
D).
• If there is no input connector or decoder
corresponding to a format, that format will not be
selectable (the cursor will skip over that entry).
• If you change the format of the channel to which the
SDI signal is assigned to AUTO of the COMPOSITE
menu with the BKM-21D installed, the image may
not be displayed. In this case, change the signal
format to NTSC or PAL once, then reset it to AUTO.
• If you change the format of the PAL-M Y/C signal to
AUTO of the YC menu with the BKM-26M installed,
the image may not be displayed. In this case, select
PAL-M S or D.
[C112] COMPONENT menu
Select the component signal format, or RGB.
YPBPR SMPTE/EBU-N10
YPBPR BETACAM: SETUP 7.5 or 0.
RGB
[C113] SDI menu
Select the format of the serial digital signal
1)
.
NTSC: SETUP 7.5 or 0.
PAL: S (simple) or D (delay)
4:2:2
AUTO: The NTSC, PAL or 4:2:2 format of the input
signal is detected and switched automatically.
1)
1) • It will take a few seconds to detect the format of an
input signal when AUTO is selected. It is
recommended that a particular format be selected if it
is determined.
• If the serial digital signal is not properly displayed in
SDI AUTO mode, re-enter the channel number.
HD SDI
[C12] YC SEP menu
Select a Y/C separation filter.
TRAP/BPF: Select TRAP/BPF filter.
2 LINES COMB: Select 2 LINES COMB filter.
3 LINES COMB: Select 3 LINES COMB filter.
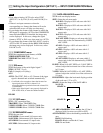
[C13] SCREEN MODE menu
Select the scan size.
16:9-NORM: Overscanned 16:9 aspect ratio.
16:9-UNDR: Underscanned 16:9 aspect ratio.
4:3-NORM: Overscanned 4:3 aspect ratio.
4:3-UNDR: Underscanned 4:3 aspect ratio.
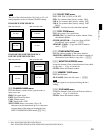
[C14] SAFE AREA MODE menu
Set the safe area display modes.
SIZE: Select the safe area mode.
16:9-80%: Displays a 80% safe area with 16:9
aspect ratio.
16:9-88%: Displays a 88% safe area with 16:9
aspect ratio.
16:9-90%: Displays a 90% safe area with 16:9
aspect ratio.
16:9-93%: Displays a 93% safe area with 16:9
aspect ratio.
16:9-ANY SIZE: Displays a safe area with 16:9
aspect ratio in the size determined by H SIZE
and V SIZE.
4:3-80%: Displays a 80% safe area with 4:3
aspect ratio.
4:3-88%: Displays a 88% safe area with 4:3
aspect ratio.
4:3-90%: Displays a 90% safe area with 4:3
aspect ratio.
4:3-ANY SIZE: Displays a safe area with 4:3
aspect ratio in the size determined by H SIZE
and V SIZE.
H SIZE: When 16:9-ANY SIZE or 4:3-ANY SIZE is
selected, adjust the horizontal size of the safe area
in 1% steps.
V SIZE: When16:9-ANY SIZE or 4:3-ANY SIZE is
selected, adjust the vertical size of the safe area in
1% steps.
H POSITION: Adjust the horizontal display position
of the safe area (–32 to +32).
SHAPE: Select the shape of the SAFE AREA
MARKER.
SHAPE A:
SHAPE B:
4:3 AREA MARKER: Select whether the 4:3 line is
displayed in16:9 screen or not (ON or OFF).
4:3 BLANKING: Select the blanking outside the 4:3
area.
HALF: Half blanking
BLACK: Blanks outside the 4:3 area.
OFF: Do not blank.
[C1]
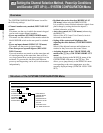
Setting the Input Configuration (SET UP 1) — INPUT CONFIGURATION Menu