


6
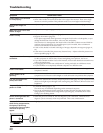
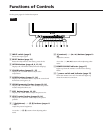
Functions of Controls
See the given pages for further description.
Front
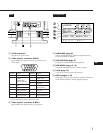
1 INPUT switch (page 5)
Selects the input signal.
2 RESET button (page 12)
Resets the adjustment to the factory preset levels.
3 OPTION button (pages 8, 9, 13, 16)
Displays the “OPTION” OSD (On Screen Display).
4 COLOR button (pages 12, 15)
Displays the “COLOR” OSD to adjust color
temperature.
5 SCREEN button (pages 11, 14)
Displays the “SCREEN” OSD to adjust the vertical and
horizontal convergence, etc.
6 GEOM (geometry) button (pages 10, 14)
Displays the ”GEOMETRY” OSD to adjust the picture
rotation and pincushion, etc.
7 SIZE button (pages 10, 14)
Displays the “SIZE” OSD to adjust the picture size.
8 CENT (center) button (pages 10, 14)
Displays the “CENTER” OSD to adjust the picture
position.
9 ¨ (brightness) −/+ (./>) buttons (pages 8
– 16)
Adjust the picture brightness.
Act as the –/+ (./>) buttons when adjusting other
items.
0 > (contrast) −/+ (?//) buttons (pages 8 –
16)
Adjust the contrast.
Act as the −/+ (?//) buttons when adjusting other
items.
!¡ POWER SAVING indicator (page 17)
Lights up when the monitor is in the Power Saving
Mode.
!™ u power switch and indicator (page 17)
Turns the monitor on or off. The indicator lights up
when the monitor is turned on.