


99
nN
Using Your VAIO Computer
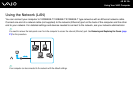
To connect to a wireless network
1 Make sure an access point is set up.
See the manual that came with your access point for more information.
2 Turn on the WIRELESS switch.
3 Click Start, All Programs, and VAIO Control Center.
4 Click Network Connections and VAIO Smart Network.
5 Click Advanced in the right pane.
✍
For information on the VAIO Smart Network software, see the help file included with the software.
6 Click the button next to or above your desired wireless option(s).
Make sure the WIRELESS indicator light turns on.
!
Wireless LAN communication (IEEE 802.11a standard) using only the 5 GHz band, available on selected models only, is disabled by default. To enable
5 GHz band communication, you need to select the option to use the 5 GHz band or both the 2.4 GHz and 5 GHz bands on the WLAN tab in the VAIO
Smart Network settings window.
7 Right-click or on the taskbar and select Connect to a network.
8 Select the desired access point and click Connect.
✍
For WPA-PSK or WPA2-PSK authentication, you must enter a passphrase. The passphrase is case sensitive and must be a text string between 8 and
63 characters in length or a hexadecimal string of 64 characters.