


2.1 Quick Tour for ES-200-77
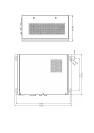
Before you start to set up ES-200, please take a moment to be familiar with the locations and
purposes of the controls, drives, connectors and ports, which are illustrated in the figures
below. When you place the panel PC upright on the desktop, its front panel appears as shown
in Figure 2-1.
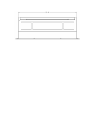
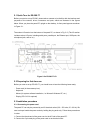
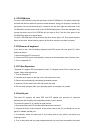
The sunken I/O section is at the bottom of the panel PC, as shown in Fig. 2-2. (The I/O section
includes various I/O ports, including serial ports, parallel port, the Ethernet port, USB ports, the
microphone jack, and so on.)
Figure 2-2:ES-200-77 I/O
2.2 Preparing for first-time use
Before you start to set up ES-200-77, you should have at least the following items ready:
‧ Power cord (in the accessory box)
‧ Keyboard
‧ Mouse (for system software installation, i.e. Microsoft Windows NT, etc.)
‧ Display (ES-3115 for optional)
2.3 Installation procedure
2.3.1 Connecting the power cord
The panel PC can only be powered by an AC electrical outlet (100 ~ 250 volts, 50 ~ 60 Hz). Be
sure to always handle the power cords by holding the plug ends only. Follow these procedures
in order:
1. Connect the female end of the power cord to the AC inlet of the panel PC.
2. Connect the 3-pin male plug of the power cord to an electrical outlet.