


PC, and then turn on the panel PC.
5. If necessary, run the panel PC's BIOS setup program to configure the parallel port to
respond as required by your printer and software operating environment.
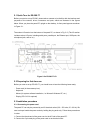
3.5 Serial COM ports
There are three serial COM ports on the bottom of the rear cover. You can easily attach a
serial device to the panel PC, such as an external modem or mouse. Follow these instructions:
1. Be sure the panel PC and any other peripheral devices you may have connected to the
panel PC are turned off.
2. Attach the interface cable of the serial device to the panel PC's serial port. If necessary,
attach the other end of the interface cable to your serial device. Fasten any retaining screws.
3. Turn on any other peripheral devices you may have connected to the panel PC, and then
turn on the panel PC.
4. Refer to the manual(s) which accompanied your serial device(s) for instructions on
configuring your operating environment to recognize the device(s).
5. Run the BIOS setup program and configure the jumper settings to change the mode of the
COM ports.
3.6 VGA port
An external VGA-compatible device may be connected to the system through the 15-pin
external port located on the rear of the system unit.
The panel PC simultaneously supports an external CRT monitor in addition
to its own LCD display.
1. Be sure the panel PC is turned off.
2. Connect the external monitor to the system.
3. Turn on the panel PC and the external monitor.
3.7 USB ports
An external USB device may be connected to the system through the 4-pin USB ports located
on the rear side of the system unit.
1. Connect the external device to the system.
2. The USB ports support hot plug-in connection. You should install the device driver before
you use the device.
3.8 Audio interface
The audio interface includes three jacks: microphone in, line out and line in.
Their functions are:
Microphone in: Use an external microphone to record voice and sound.