


Chapter 3 Configuring the Preinstalled Solaris 10 Operating System 37
▼ To Connect to the Server Using the Service
Processor’s IP Address
Note – This procedure assumes that you have connected the server to your network
through an Ethernet cable.
1. If you have not already done so, determine the service processor’s IP address:
a. Power on main power to the platform by using a stylus to press the recessed
Power button on the front panel.
POST messages appear on your screen as the OS boots up.
b. Initialize the BIOS Setup utility by pressing the F2 key while the system is
performing the power-on self-test (POST).
c. When the main BIOS screen is displayed, select Advanced.
d. When the Advanced screen is displayed, select IPMI 2.0 Configuration.
When the IPMI 2.0 Configuration screen is displayed, select the LAN
Configuration menu item.
e. Select the IP Address menu item.
The service processor’s IP address is displayed using the following format:
Current IP address in BMC: xxx.xxx.xxx.xxx
2. Using a client system, establish a Secure Shell (SSH) connection to the service
processor’s IP address.
ssh -l root sp_ip_address
3. Log in to the service processor as an Administrator, for example:
login: root
password: changeme
4. Start the ILOM console mode by entering the following:
start /SP/console
You can configure the SP serial port to display the installation process to a VGA
connection (video port). See “Selecting Your Console Output” on page 35.
5. If you have changed the SP Serial Port default settings, make sure you reset them
to the default settings.
6. Follow the Solaris 10 on-screen prompts.
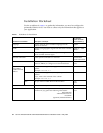
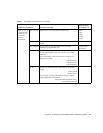
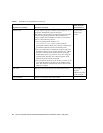
Use the information gathered in “Installation Worksheet” on page 32 to help you
enter the system and network information as you are prompted.