


Chapter 3 Troubleshooting DIMM Problems 19
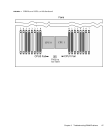
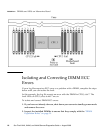
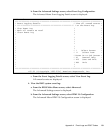
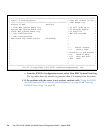
3. Press the PRESS TO SEE FAULT button, and inspect the DIMM fault LEDs. See
FIGURE 3-1 and FIGURE 3-2.
A flashing LED identifies a component with a fault.
■ For CEs, the LEDs correctly identify the DIMM where the errors were detected.
■ For UCEs, both LEDs in the pair flash if there is a problem with either DIMM
in the pair.
Note – If your server is equipped with a mezzanine board, the motherboard DIMMs
and LEDs will be hidden beneath it. However, the Motherboard Fault LED lights to
indicate that there is a problem on the motherboard (only while AC power is still
connected). If the Motherboard Fault LED on the mezzanine board lights, remove
the mezzanine board as described in your server’s service manual, and inspect the
LEDs on the motherboard.
4. Disconnect the AC power cords from the server.
Caution – Before handling components, attach an ESD wrist strap to a chassis
ground (any unpainted metal surface). The system’s printed circuit boards and hard
disk drives contain components that are extremely sensitive to static electricity.
Note – To recover fault information look in the SP SEL, as described in the Sun
Integrated Lights Out Manager 2.0 User's Guide.
5. Remove the DIMMs from the DIMM slots in the CPU.
Refer to your server’s service manual for details.
6. Visually inspect the DIMMs for physical damage, dust, or any other
contamination on the connector or circuits.
7. Visually inspect the DIMM slot for physical damage. Look for cracked or
broken plastic on the slot.
8. Dust off the DIMMs, clean the contacts, and reseat them.
Caution – Use only compressed air to dust DIMMs.
9. If there is no obvious damage, replace any failed DIMMs.
For UCEs, if the LEDs indicate a fault with the pair, replace both DIMMs. Ensure
that they are inserted correctly with ejector latches secured.
10. Reconnect AC power cords to the server.