


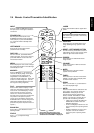


3M
™
Multimedia Projector MP8745 © 3M 1999
ENGLISH
14
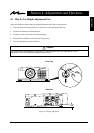
4.2 Plug & Play Function
This projector is VESA DDC 1/2B compatible. Plug & play is possible by connecting to a computer that is VESA
DDC (Display Data Channel) compatible. Plug & play is a system configured with peripheral equipment
including a computer and display, and a compatible operating system.
✔ Note
Use the RGB cable included with this projector when using plug & play. With other cables, pins (12) - (15) are
sometimes not connected (effective only for RGB1).
4.3 Freeze Function
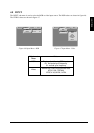
The Freeze function is used to display (freeze) a single frame of the image being projected.
✔ Note
The FREEZE function will turn off during the operation of the MENU, FOCUS, PinP, VOLUME, MUTE, BLANK,
MAGNIFY, AUTO or POSITION functions.
4.4 Magnify Function
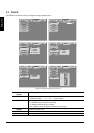
The Magnify function is used to enlarge a portion of the display image. Press the MAGNIFY (+) button to
magnify the center of the displayed image. Press again to magnify to 4x. Press the MAGNIFY (-) button to
reduce image size. Press OFF to return to normal image size. To move the display area being magnified, press the
POSITION button, then use the DISC PAD to move the magnified area up, down, left or right.
✔ Note
To return to normal display, press the MAGNIFY OFF button. The MAGNIFY function will turn off during the
operation of the MENU, FOCUS, PinP, VOLUME, MUTE, BLANK, FREEZE or AUTO functions.
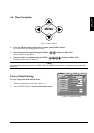
4.5 Picture-in-Picture
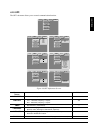
The PinP button on the remote control is used to display a video signal image in the RGB signal image. Press the
PinP button to display the PinP screen (small size). Press again to increase the screen size (maximum size
screen). Press a third time to exit the function and remove the PinP screen.
[small screen size
➔ maximum screen size ➔ OFF]
Both RGB and Video signals must be present for the picture-in-picture function to operate.
1. Select RGB1 or RGB2 input.
2. Start the video input source.
3. Press the PinP button on the remote control to display a small PinP screen in the corner of the projector
image. Press the PinP button again to enlarge the size of the screen display to maximum.
4. Press the POSITION button on the remote control to change the location of the PinP screen. The
position of the picture-in-picture screen can also be changed from the Image menu.
5. Press the PinP button a third time to exit the function and remove the PinP screen from the projector
image.