


36 37
Operations
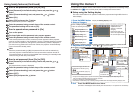
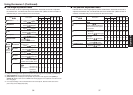
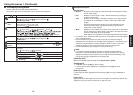
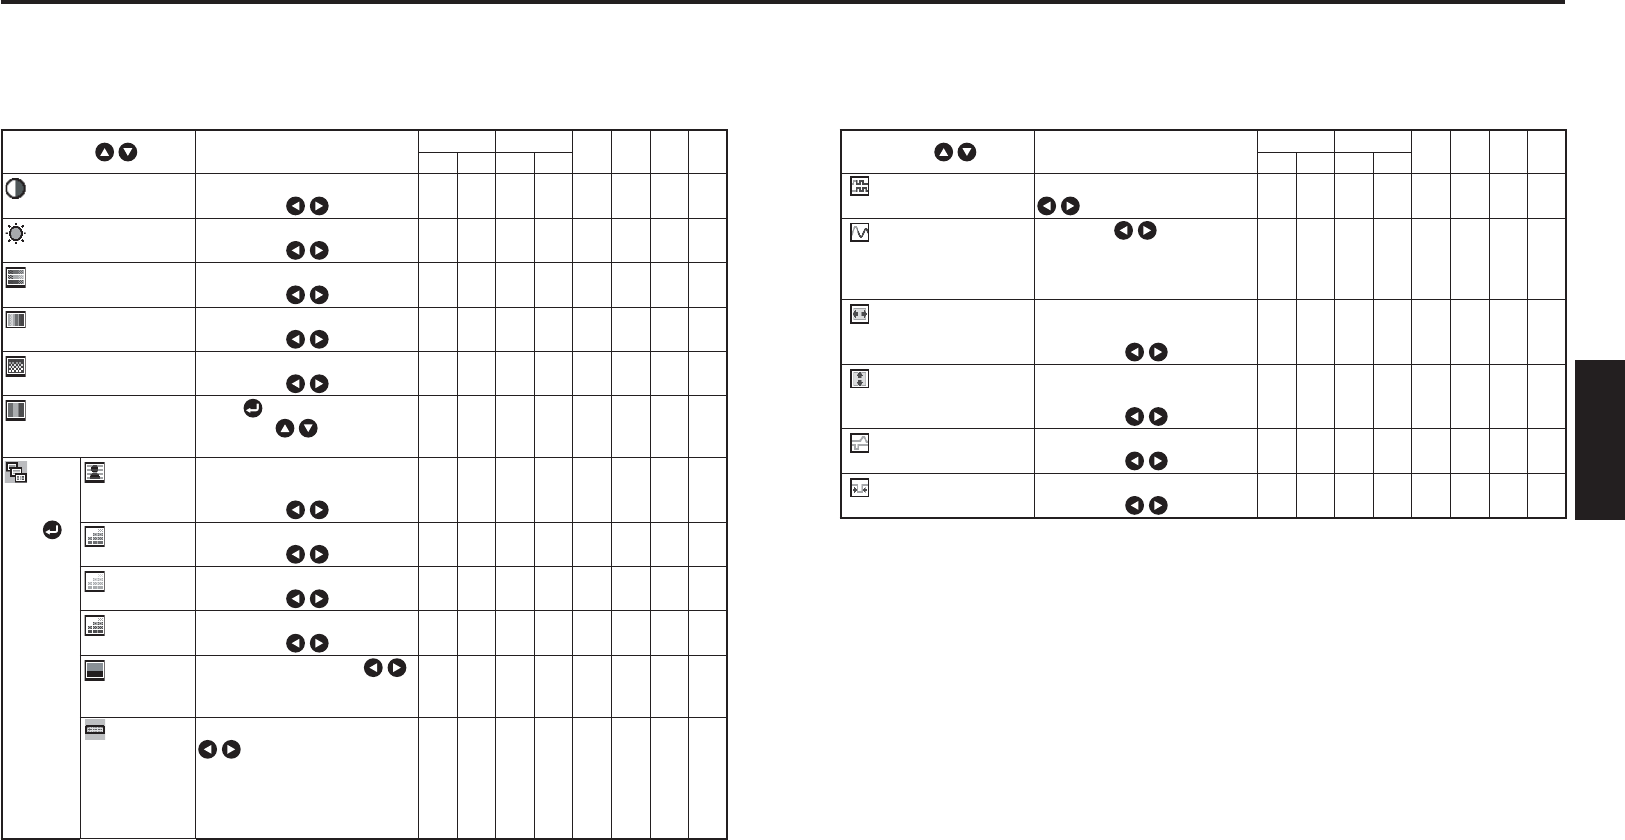
The image adjustment menu
Use this menu to set or adjust image-related items. Items that can be set or adjusted
are marked “Yes”, and those that cannot are marked “No”. (When an item is masked, it
indicates that you cannot select for the current input.)
Item Description
Digital Analog
Video
S-video
Network
USB
memory
RGB
Y/PB/PR
RGB
Y/PB/PR
Contrast
Adjust the image contrast.
Lower
Higher
Ye s Ye s Ye s Ye s Ye s Ye s Ye s Ye s
Brightness
Adjust the brightness of the image.
Darker Brighter
Ye s Ye s Ye s Ye s Ye s Ye s Ye s Ye s
Color
Adjust the color of the image.
Lighter
Deeper
No Yes No Yes Yes Yes No No
Tint
*1
Adjust the tint of the image color.
Reddish Greenish
No No No No Yes Yes No No
Sharpness
Adjust the sharpness of the image.
Softer Sharper
No Yes No Yes Yes Yes No No
Picture mode
Press
. Toggle the picture
mode with .
Bright/Standard/True color
Ye s Ye s Ye s Ye s Ye s Ye s Ye s Ye s
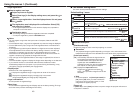
Advanced
adjustment
Press
to enter the
advanced
adjustment
Noise
reduction
*2
Adjust the screen noise
reduction level.
Softer
Stronger
Ye s Ye s Ye s Ye s Ye s Ye s Ye s Ye s
R-level
Adjust red of the image color.
Less red
More red
Ye s Ye s Ye s Ye s Ye s Ye s Ye s Ye s
G-level
Adjust green of the image color.
Less green
More green
Ye s Ye s Ye s Ye s Ye s Ye s Ye s Ye s
B-level
Adjust blue of the image color.
Less blue
More blue
Ye s Ye s Ye s Ye s Ye s Ye s Ye s Ye s
NTSC
mode
*3
Set the black level with .
US : NTSC (US) mode
JAPAN : NTSC (JAPAN) mode
No No No No Yes Yes No No
DVI mode
*4
Set the connecting device with
.
PC : connect to PC
AV equipment
: connect to AV
equipment
(DVD player)
Yes Yes No No No No No No
*1: [Tint] can be displayed and adjusted only when the video signal is set to [NTSC] or [NTSC4.43].
*2: [Noise reduction] may not work depending on signal type.
*3: [NTSC mode] can be displayed and adjusted only when the video signal is set to [NTSC] or
[NTSC4.43]. NTSC mode is set to JAPAN when the language is set to Japanese. It is set to US for
other languages.
*4: If the output settings of the connected device are incorrectly set, black and dark areas of the
picture may not be displayed properly.
■
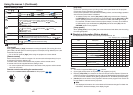
Using the menus 1 (Continued)
The position adjustment menu
Use this menu to set or adjust picture position-related items. Items that can be set or
adjusted are marked “Yes”, and those that cannot are marked “No”. (When an item is
masked, it indicates that you cannot select for the current input.)
Item Description
Digital Analog
Video
S-video
Network
USB
memory
RGB
Y/PB/PR
RGB
Y/PB/PR
Phase Adjust to eliminate fl icker with
NoNoYesNoNoNoNoNo
Frequency
Adjust with to eliminate
periodic patterns and fl ickering
when fi ne vertical lines appear
on the screen.
NoNoYesNoNoNoNoNo
H-position Adjust the horizontal position
of the image.
Move left
Move right
NoNoYesNoNoNoNoNo
V-position Adjust the vertical position of
the image.
Move down
Move up
NoNoYesNoNoNoNoNo
Clamp pulse 1
Adjust the clamp pulse position.
Lower Higher
NoNoYesNoNoNoNoNo
Clamp pulse 2 Adjust the clamp pulse width.
Narrower
Wider
NoNoYesNoNoNoNoNo
■