


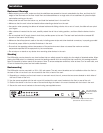


1
1 5 6 7
2 3 4
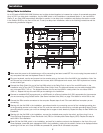
2 3 5 6 74
3
Overview
Component Features
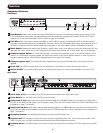
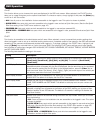
Front Panel
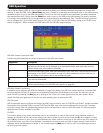
1
Push-Buttons: Pressapush-buttontobringtheKVMfocustothatport.Simultaneouslypressingpush-buttons1and
2 for three seconds will perform a keyboard/mouse reset. Simultaneously pressing push-buttons 15 and 16 for three
secondswillinvokeAutoScanMode.(SeeF7:SCANonpage18fordetails.)
2
Port LEDs:Eachpush-buttoncontainstwoLEDs;anOnline LEDontheleft,andaSelected LEDontheright.Whena
computerisconnectedtoaportandpowered-ON,thatport’sOnline LEDilluminatesgreen.Whenaporthasthefocusof
theKVM,it’sSelected LEDilluminatesorange.WhenaccessedinAutoScanMode,theport’sSelected LED flashes.
3
Reset Button:Pressingtheresetbuttonperformsasystemreset,whichisthesameasturningtheKVMswitchOFFand
thenbackON.Note: This button is semi-recessed and will need to be pressed with a small object, such as a paperclip.
4
Firmware Upgrade Switch:InnormalKVMoperation,thisswitchshouldalwaysbesettotheNormal position. In the
eventofanunsuccessfulrmwareupgrade,thisswitchwillneedtobesettotheRecover position in order to perform a
rmwareupgraderecovery.(SeeFirmwareUpgradeRecoveryonpage20fordetails.)
5
Firmware Upgrade Port:TheincludedrmwareupgradecableconnectstotheKVMswitchhereduringarmware
upgrade.
6
Power LED:ThisLEDilluminatesbluewhentheKVMswitchisconnectedtoapowersourceandturnedon.
7
Station ID LED:ThisnumericalLEDdisplaystheKVMswitchespositioninadaisy-chaininstallation,from01to32.
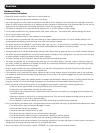
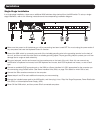
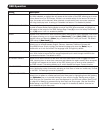
Rear Panel
1
Power Input (C14): TheincludedC13to5-15PpowercordconnectstotheKVMswitchhere.
2
Power Switch: TurntheKVMswitchON/OFFusingthisswitch.
3
Daisy-Chain In Port:Whendaisy-chainingKVMswitchestogether,thisDB25FemaleportconnectstotheDaisy-Chain
OutportofthepreviousKVMswitchintheinstallationusingaTrippLiteP772-SeriesDaisy-ChainCable.(SeeDaisy-Chain
Installationonpage7fordetails.)
4
Daisy-Chain Out Port:Whendaisy-chainingKVMswitchestogether,thisDB25MaleportconnectstotheDaisy-Chain In
portofthenextKVMintheinstallationusingaTrippLiteP772-SeriesDaisy-ChainCable.(SeeDaisy-ChainInstallationon
page7fordetails.)
5
Grounding Terminal:TheincludedgroundingwireconnectstheKVMswitchhere.
6
Console Ports:Thekeyboard,monitorandmouseconnecttotheKVMswitchhere.TheconsoleportsincludeaVGA
(HD15)monitorport,twoPS/2keyboard/mouseportsandtwoUSBkeyboard/mouseports.
7
Computer Ports: TheCat5e/6cablesthatconnecttoeachcomputer’sServer Interface Unit (SIU) plugintototheKVM
here.