


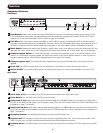
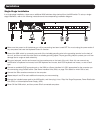


SIU SIU
Cat5e/6 Cable Cat5e/6 Cable
SIU SIU
Cat5e/6 Cable Cat5e/6 Cable
SIU SIU
Cat5e/6 Cable
Up to 32 Levels
Cat5e/6 Cable
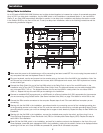
6
6
6
2
8
8
8
3
4
4
4
5
5
5
3
3
7
7
7
7
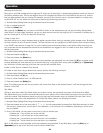
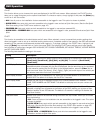
Installation
Daisy-Chain Installation
Upto32levelsofB064-016KVMSwitchescanbedaisy-chainedtogethertoincreasethenumberofconnectedcomputers
toupto512.Inadaisy-chaininstallation,therstKVMswitchintheinstallationisconsideredStation 1,thenextKVMis
Station 2,etc.EachKVMautomaticallyidentiesitspositioninthedaisy-chaininstallationanddisplaysthestationnumber
in the Station IDLEDonthefrontoftheunit.Tosetupadaisy-chaininstallation,refertothefollowinginstructionsandthe
correspondinginstallationdiagram:
1
MakesurethatpowertoallthedevicesyouwillbeconnectinghasbeenturnedOFF.Youmustunplugthepowercordsof
any computers that have the Keyboard Power On function.
2
Plugyourkeyboard,monitorandmouseintotheconsoleportsonthebackoftherstKVMintheinstallation.Note: You
can connect any combination of keyboard and mouse; both USB keyboard and mouse, both PS/2 keyboard and mouse,
or one of each type.
3
Connect the Daisy-Chain OutportoftherstKVMswitchtotheDaisy-Chain InportofthenextKVMswitchinthe
installation using a Tripp Lite P772-Series Daisy-Chain Cable. Note: The distance between any two daisy-chained KVMs
can not exceed 49 ft. (15 m.). The distance between the first and last KVM in a daisy-chain can not exceed 328 ft.
(100 m.). Repeat this step for each KVM you are adding to the installation.
4
ConnectanavailableRJ45computerportonaKVMswitchtoaServer Interface Unit (SIU) appropriate for the computer
youareconnectingusingCat5e/6cable.(SeeServerInterfaceUnits(SIUs)onpage2fordetailsonwhichSIUtouse.)
5
ConnecttheSIUsconsoleconnectorstothecomputer.Repeatsteps4and5foreachadditionalcomputeryouare
connecting.
6
StartingwiththerstKVMintheinstallation,groundeachswitchbyconnectingoneendoftheincludedgroundingwire
tothegroundingterminalonthebackoftheunit,andthenconnecttheotherendtoasuitablegroundingobject.Proper
groundinghelpstoprotectyourunitfromdamageduetosurgesorstaticelectricity.RepeatthisstepforeachKVMinthe
installation.
7
StartingwiththerstKVMintheinstallation,connecttheincludedpowercordtotheswitch,andthenplugitintoa
TrippLiteSurgeSuppressor,PowerDistributionUnit(PDU)orUninterruptiblePowerSupply(UPS).Repeatthisstepfor
eachKVMintheinstallation.
8
Power-ONtherstKVMswitchintheinstallation,andwaitforitsstationnumbertobedisplayedonthefrontoftheunit.
Oncedisplayed,power-ONeachsubsequentKVMintheinstallation,waitingforthestationnumbertobedisplayedbefore
poweringonthenextunit.OnceallKVMsarepowered-ON,power-ONallconnectedcomputers.