


General Instructions
• Observe the safety warnings on page 1. Follow the
installation steps (pages 2–7) in the exact order given.
• To ensure the plug is properly connected, do not assemble
at temperatures below 0°F (–18°C).
• The Frostex system can be left plugged in all year, but you
will save energy by unplugging the system when there is
no risk of freezing.
• Use a properly grounded, 3-prong, 120-volt outlet. If you
are not sure if your outlet is properly grounded, call a
professional service person.
• In manufactured housing installations, use the electrical
receptacle on the underside of the home. Do not use an
extension cord or there may be danger of fire or shock.
Using an extension cord is not in compliance with national
electrical codes.
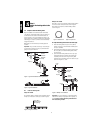
• Frostex heating cable may be used on metal or plastic pipes
and tubing. Do not install on garden hoses or in applications
with tubing that is flexed frequently.
• Exposure to temperatures above 150°F (65°C) will shorten
the life of your Frostex heating cable. Before installing the
heating cable on hot water pipes, set the water heater ther-
mostat below 150°F (65°C), low to medium on most ther-
mostats.
• Remove any old heating tapes and insulation before you
install the Frostex heating cable.
• Do not use more than 50 feet (15 meters) of Frostex heat-
ing cable with each 9800 FlexFit plug. Longer lengths will
blow the nonreplaceable fuse in the plug.
• The homeowner will need to keep these instructions for
future reference. It contains important safety warnings and
maintenance information.
• If you have any difficulty installing the system, please contact
Tyco Thermal Controls for information at (800) 545-6258, or
call a professional service person for help.
• Remove the clear label that covers the test and reset buttons
after installation.
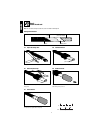
Installation Instructions
Step 1.
Determine the length of heat-
ing cable you need.
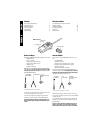
1A. Collect the necessary information.
You will need to know the following:
• Type of pipe (plastic or metal).
• Length and diameter of pipe.
• Lowest expected air temperature (disregard windchill).
• Number of valves and spigots (requires additional heating
cable).
• If there is a crock (typically used for manufactured housing
applications).
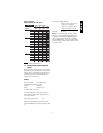
1B. Determine the amount of Frostex heating
cable you will need.
How to use the tables:
• Decide on the lowest temperature you can expect in your
area, down to –40°F (–40°C).
• Measure the diameter of your pipe in inches.
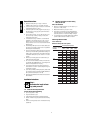
• Using Table 1 or 2 depending on pipe material, determine
how many straight runs of Frostex heating cable required to
protect the pipe. One run is equal to the length of the pipe.
• To minimize the amount of heating cable required, select the
optimal insulation thickness from Table 1 or Table 2.
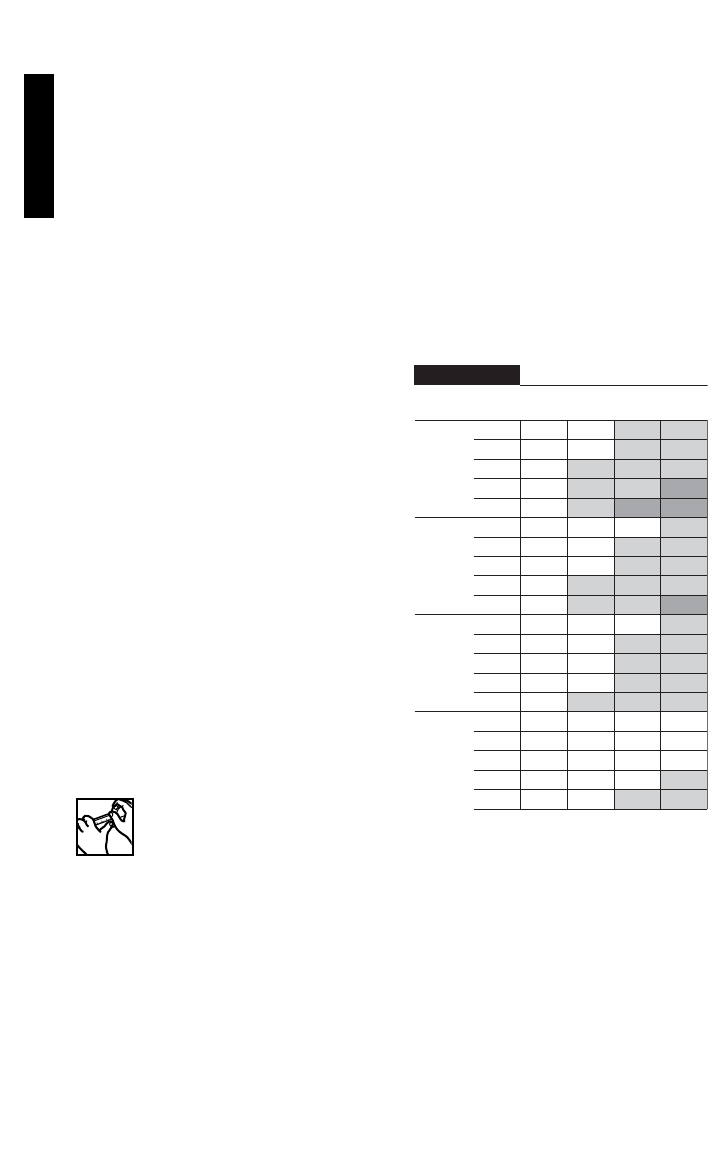
Cable Length Selection Tables
Table 1. Metal Pipe
Number of heating cable runs required
1/2"1/2" 1 1 2 2
Pipe SizeInsulation
Thickness
20°F
(–10°C)
0°F
(–20°C)
–20°F
(–30°C)
–40°F
(–40°C)
3/4" 1 1 2 2
1" 1 2 2 2
1 1/4" 1 2 2 3
1 1/2" 1 2 3 3
1/2"3/4" 1 1 1 2
3/4" 1 1 2 2
1" 1 1 2 2
1 1/4" 1 2 2 2
1 1/2"
3/4"
1"
1 1/4"
1 1/2"
2"
3/4"
1"
1 1/4"
1 1/2"
2"
1223
1" 1 1 1 2
1122
1122
1122
1222
1 1/2" 1 1 1 1
1111
1111
1112
1122
Lowest Expected Temperature
Metal Pipe
2
ENGLISH