Step 5.
Install the insulation.
Thermal insulation must be used. It protects the Frostex heat-
ing cable from damage and helps keep the pipes from freezing.
Before you insulate, be sure the Frostex heating cable is
undamaged—no nicks or cuts—and the braid is intact.
Replace the heating cable if necessary.
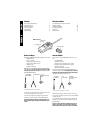
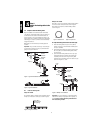
5A. Cover the system with the insulation.
Cover the pipe, heating cable, connections, valves, and spigots
with clean, dry, waterproof, fire-retardant thermal insulation,
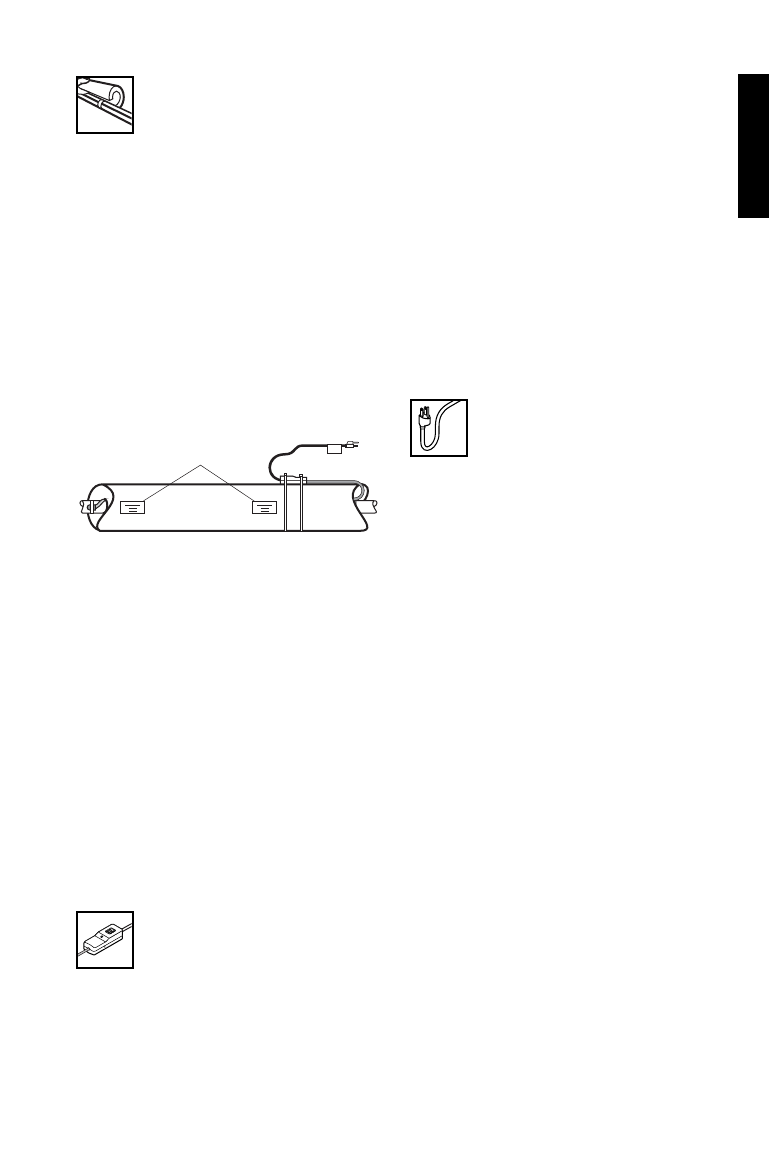
such as closed-cell foam insulation, as shown in Figure 7. The
insulation must be at least as thick as selected in Table 1 or 2.
Secure the 9800 FlexFit plug to the insulation with tape or
plastic cable ties, being careful not to cover the light or test
buttons.
Figure 7. Thermal insulation.
• Do not leave the heating cable exposed, except for the
short distance from the pipe to the power connection.
• Fully insulate and weatherproof all exposed piping. Put
additional insulation on areas that cannot be heat traced.
5B. Waterproof the insulation.
Make sure the thermal insulation is waterproof and stays dry.
Install a watertight sleeve and a solid cover or a barrier such as
polyethylene sheeting around the insulation wherever there is
any chance that the insulation might get wet.
5C. Install the warning label.
Install the orange warning labels on the insulation with one
near the electrical outlet, as shown in Figure 7.
Additional labels and installation tape are available from Tyco
Thermal Controls in the Frostex 9610 kit.
Step 6.
Start up the system.
6A. Plug in the heating cable.
After installing the heating cable and insulation, remove the
clear label that covers the test and reset buttons. Then, plug the
9800 FlexFit plug into a grounded and properly installed outlet.
• If the Frostex heating cable length is longer than 40 feet
and the air temperature is lower than 30°F, run water
through the pipe before plugging in the unit. This will
warm up the pipe and help avoid blowing the nonreplace-
able fuse in the 9800 FlexFit plug.
• The signal light will go on indicating that the ground-fault
protection device and the fuse are working properly.
However, the light does not confirm that the heating cable
is properly connected. See Step 7, “Test the System.”
6B. Test the plug.
• Press the white test button. The red reset button should
pop out from the surface of the plug and the signal light
should go out.
• When the red reset button pops out, push it in to restore
power and proceed to Step 7.
If the red reset button fails to pop out,
skip to
“Troubleshooting.”
If the red reset button pops out immediately but cannot
be reset,
skip to “Troubleshooting.”
If the signal light does not light,
skip to “Troubleshooting.”
Step 7.
Test the system.
Test the system using one of the two following procedures.
7A. Test the water temperature.
After plugging in the system, wait about an hour. Turn on a
water tap on the Frostex-protected pipe and test the tempera-
ture of the water. It should feel warm almost immediately
because the water heated by the Frostex heating cable will be
briefly running through the pipe.
If the water is warm,
you have completed the installation.
If the water is not warm,
skip to “Troubleshooting.”
7B. Test the heating cable’s resistance.
It is possible to test the resistance of Frostex heating cable
using a multimeter. Follow these steps:
• Be sure the 9800 FlexFit plug is unplugged.
• Push in the red reset button on the plug.
• Connect the two lead wires on the meter to the two flat
prongs on the plug. The meter reading should be between
2 and 20,000 ohms.
If your reading is within this range,
you have completed
the installation.
If your reading is not within this range,
repeat Step 3,
“Install the 9800 FlexFit plug” and retest.
If your reading is still not within this range or you
have questions,
call Tyco thermal controls for techni-
cal support at (800) 545-6258.
Warning
labels
7
ENGLISH


