


8 Chapter 2
Step 6: Update the BIOS on Each Converted Thin Client
In this step you will use the USB Firmware Tool to update the BIOS of each thin client to
BIOS version 3.0D. To do this, you must repeat the following steps on a separate
(second) USB key using the commandsXml.xml file located in the Z Class ThinOS 3.0D
BIOS Image folder on your hard drive (this is the location you selected in "Step 1: Copy
the Z Class ThinOS Conversion Image Folder and Z Class ThinOS 3.0D BIOS Image
Folder to Your Local Hard Drive"):
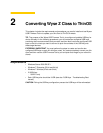
1. "Step 3: Use Wyse USB Firmware Tool to Configure a Single USB Key that will Push
Firmware"
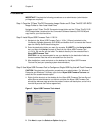
2. "Step 4: Use the Configured USB Key to Install Firmware on Each Thin Client"
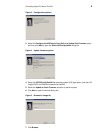
3. "Step 5: Verifying Thin Client Operation"
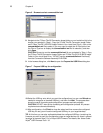
4. After verifying thin client operation, verify the BIOS version by doing the following:
Reboot your thin client and you will see a Wyse logo for a short period of time. During
this period you can press and hold the Delete key to enter the BIOS to view the BIOS
version (enter Fireport as the password). Be sure the BIOS version is 3.0D (you can
also note that for security, the Boot from USB option is disabled by default). After
verification, close the BIOS. The thin client is ready for operation and setup by an
administrator.
TIP: For more information, see Administrators Guide: Wyse ThinOS™.
Administrator and other documentation for your thin client model are available at:
http://www.wyse.com/manuals
.
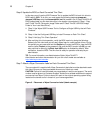
Step 7: Attach a Wyse Conversion Label on Each Converted Thin Client
The conversion kit is supplied with Wyse Conversion Labels that must be attached to each
thin client. Be sure you have purchased the amount of labels you need.
CAUTION: Failure to install the labels may cause delays in service and support. The serial
number must be given to a Customer Support Technician to validate entitlement to support
and service from Wyse. Failure to do so will result in the original operating system being
loaded on the device and is in breach of your license agreement.
Figure 8 Placement of Wyse Conversion Label (blank example)