


4 Chapter 2
Procedures
IMPORTANT: Complete the following procedures as an administrator (administrator
privileges are required).
Step 1: Copy the Z Class ThinOS Conversion Image Folder and Z Class ThinOS 3.0D BIOS
Image Folder to Your Local Hard Drive
Navigate to the Z Class ThinOS Conversion Image folder and the Z Class ThinOS 3.0D
BIOS Image folder (contained on the Conversion Software Assembly DVD-ROM) and
copy them to your local hard drive.
Step 2: Install Wyse USB Firmware Tool v1.19.0.4
1. Navigate to the Wyse USB Firmware Tool v1.19.0.4_GA.exe (contained on the
Conversion Software Assembly DVD-ROM) and double-click it to execute the file and
open the WinZip Self-Extractor dialog box.
2. Enter the destination folder you want (for example, C:\USBFT) in the Unzip to folder
box, and then click Unzip to extract all files from the Wyse USB Firmware Tool
v1.19.0.4_GA.exe file into the folder. The default directory for the extracted files is
Wyse USB Firmware Tool.
CAUTION: It is not recommended to use your desktop for the destination folder as
there are several files that will be extracted from the .exe file.
3. After installation, create a shortcut on the desktop for the Wyse USB Firmware
Tool.exe file (see your operating system documentation).
Step 3: Use Wyse USB Firmware Tool to Configure a Single USB Key that will Push Firmware
CAUTION: Complete the configuration procedures as an administrator. For Windows 7
Enterprise and Windows 7 Ultimate, right-click on Wyse USB Firmware Tool.exe and
select the Run as administrator option.
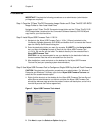
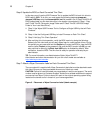
1. Right-click the shortcut on the desktop for the Wyse USB Firmware Tool.exe file and
select Run as administrator to run the tool and open the Wyse USB Firmware Tool
wizard (the welcome page provides the product version and description, and a link to
view the Wyse end user license agreement).
Figure 2 Wyse USB Firmware Tool wizard
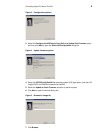
2. Click Next to open the Select an Option dialog box.