


www.x2vga.com
12
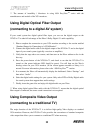
1. Please complete the audio connection according to the section entitled “Standard Setups
for Connecting to A VGA Monitor”.
2. Please make sure that the Xbox console and the X2VGA+ are powered off.
3. Connect the composite connector to the X2VGA+ “Audio In” port (please unplug the
audio cable from the X2VGA+ ”Audio In” connector in advance), and connect the other
end to the composite video in on a traditional TV set.
4. Regulate the triggers on the side of the X2VGA+, and set the first and second
dipswitches to ON.
5. Verify that the steps above are correct, and then turn on the Xbox, ensuring that the
X2VGA+ is powered off.
**The X2VGA+™ provides composite video output only while its power is turned off. If the
power of the X2VGA+™ is turned on, the composite video output will automatically be closed.
** When finished using the composite video output, you must reset Switch 1, Switch 2 to the
OFF position in order to go back to using the standard VGA monitor output.
Setting Synchronization Mode
(advanced function)
The X2VGA+
TM
provides two synchronization modes, the separate H/V sync. (VESA Standard)
and the composite sync. The separate H/V sync. is the default setting for X2VGA+
TM
(Switch 4:
OFF). However, under some specific circumstances, you can also switch to the composite sync.
(Switch 4: ON) through regulating the dip switches of X2VGA+
TM
.
**To avoid causing any crash or damage to either the Xbox console or the X2VGA+
TM
, please
do not regulate the dip switches of X2VGA+
TM
when the power button is turned on.
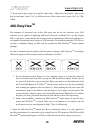
**480i EasyView function can only function in the Separate H/V sync. mode.
Specifications
Dimensions (approximate)
136mm * 53mm * 30mm (w / d / h )