


Page 2 Model MRC44CB1
© 2002 Xantech Corporation
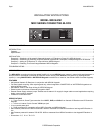
PWR
IR IN
CONTROLLER KEYPAD
+12V GND SIG
JP1
LED1
Figure 1 - MRC44CB1 Connecting Block
INSTALLATION
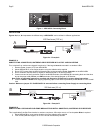
Figures 2a, b, c, & d represents the different ways a MRC44CB1 can be utilized in different applications.
FOUR ZONE - FOUR SOURCE AUDIO/VIDEO CONTROLLER/AMPLIFIER
MRC44
1234
POWER
400 feet max (122 m)
IR Receiver
A
SmartPad3 or
Waterpad
781RG Power Supply
MRC44CB1
+12VDC
SIG
GND
PWR
IR IN
CONTROLLER KEYPAD
+12V GND SIG
JP1
LED1
Figure 2a – Example A
EXAMPLE A
SUBSTITUTING A SMARTPAD3, WATERPAD OR IR RECEIVER IN PLACE OF A MRC44 KEYPAD
This is desired if an outdoor zone keypad is required or if the keypad must be mounted in a standard J-Box
1. Remove Power Jumper (JP1) from MRC44CB1
2. Mount MRC44CB1 to a convenient location using the Adhesive strip supplied
3. Run a CAT5 jumper from the MRC44 Keypad output to the connector labeled Controller on the MRC44CB1
4. Run 3 conductor 22AWG cable (or higher) to desired keypad or IR receiver location
5. Connect one end of the 3-conductor cable to the V G S terminals of the MRC44CB1 connecting block and the other
end to the proper +12v, IR Out, and GND terminals of the desired Keypad or IR Receiver.
Note: Refer to applicable instructions supplied with Keypad or IR Receiver for proper wiring instructions.
6. Connect 781RG or 782-00 Power Supply (depending upon current load requirements) to MRC44CB1 2.5mm Coaxial
Jack
Caution! Make sure jumper JP1 On MRC44CB1 is removed before connecting Power Supply to connecting block.
FOUR ZONE - FOUR SOURCE AUDIO/VIDEO CONTROLLER/AMPLIFIER
MRC44
1234
POWER
POWER
CH
CH
STATUS
SELECT
PLAY
STOP
PAUSE
FF
REW
VOL
VOL
MUTE
200 feet max (61 m)
B
IR Receiver
SmartPad3 or
Waterpad
781RG Power Supply
MRC44CB1
+12VDC
SIG
GND
PWR
IR IN
CONTROLLER KEYPAD
+12V GND SIG
JP1
LED1
Figure 2b – Example B
EXAMPLE B
SUBSTITUTING A SECONDARY SUB-ZONE MRC44 KEYPAD WITH A SMARTPAD3, WATERPAD OR IR RECEIVER
This is applicable if the Sub-Zone location is outdoors, requires a J-Box style mount, or if local speaker Mute is required.
1. Mount MRC44CB1 to a convenient location using the Adhesive strip supplied
2. From Primary MRC44 Keypad, run a CAT5 wire to the secondary location.