


Installation and Setup
Phaser 6600 Color Printer 39
User Guide
To connect to a wireless network manually:
1. At the printer control panel, press the Menu button.
Note: To navigate through the menu, use the Up or Down arrow buttons.
2. Navigate to Admin Settings, then press OK.
3. Navigate to Network Setup, then press OK.
4. Navigate to Wi-Fi Setup, then press OK.
5. Navigate to Manual SSID Setup, then press OK.
6. Enter the network SSID (name), then press OK.
7. Depending on your network mode, navigate to Infrastructure type or Ad-hoc, then press OK.
Note: Infrastructure provides the greatest selection of security options. AdHoc provides only
WEP encryption in most networks.
8. Select an encryption type, then press OK.
• As needed, enter the passphrase for the selected network, then press OK.
• If using WEP encryption, enter the WEP key and press OK, select the transmit key, then
press OK.
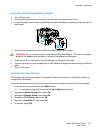
9. Restart the printer, then wait two minutes for the printer to connect.
Note: If the optional Productivity Kit (HD) is not installed, ensure that the Ready LED is off before
you turn off the printer. The data in the memory is cleared when the printer is turned off.
10. To view the new IP address and ensure that the connection is successful, print a Configuration
Report.
Connecting to a Wireless Network Using CentreWare Internet Services
Before you begin, ensure that you have the wireless network Service Set Identifier (SSID),
encryption type, and passphrase. For details, see Collecting Wireless Network Information for
Connecting to a Wireless Network Manually on page 37.
Note: To use CentreWare Internet Services to set up the printer on a wireless network, connect
the printer to your computer through an Ethernet wired network.