


13 Preparing to print
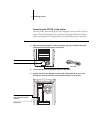
Printing EX7750 test pages
After you connect the EX7750 to the printer, print the Test Page, Configuration page,
and the Control Panel Map. The Test Page verifies that all the components of the
EX7750-to-printer interface are working. The Configuration page and the Control
Panel Map are helpful when configuring the EX7750 Setup options.
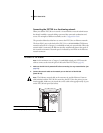
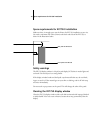
TO PRINT THE TEST PAGE
1. At the Control Panel, press the Menu button to access the Functions menu.
2. Press the line selection button for Print Pages, and then select PS Test Page.
The EX7750 sends the PS Test Page to the printer.
3. Examine the quality of the Test Page.
The Test Page confirms that the EX7750 is functional and that the connection
between the EX7750 and the printer is working properly. When you examine the Test
Page, keep in mind the following:
• All color patches should be visible, even though they may be very faint in the 5%
and 2% range.
• Each color’s patch set should show uniform gradation from patch to patch as the
color lightens from 100% to 0%.
Poor image quality may indicate a need to calibrate the system or service the printer.
Information on the Test Page includes the date and time of the last calibration. Keep
the Test Page for future reference. For more information, see the Color Guide.
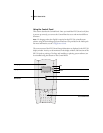
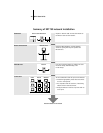
TO PRINT THE CONFIGURATION PAGE
1. At the Control Panel, press the Menu button to access the Functions menu.
2. Press the line selection button for Print Pages.
The Control Panel displays the first four types of pages you can print. To see the
remaining types of pages, press the down arrow button.
3. Press the line selection button for Configuration page.