


Scan to Mailbox Setup
6
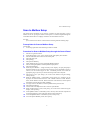
Scan to Mailbox Setup
This feature allows documents to be stored in a mailbox for future processing. Scan to
Mailbox can be set up using the machine control panel or a network computer through the
CentreWare Internet Services webpage. Instructions for each method are shown.
See also:
System Administration Guide: Contains details concerning Network Scanning setup.
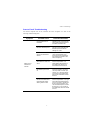
Prerequisites for Scan to Mailbox Setup
Confirm that:
1. An existing operational network utilizing TCP/IP is available.
Procedure for Scan to Mailbox Setup through the Control Panel
1. Press the <Log In/Out> button.
2. On the keypad enter “11111” or the current user ID. Select [Enter] when finished.
3. Press the <Machine Status> button on the control panel.
4. Select the [Tools] tab.
5. Select [Setup].
6. Select [Create Mailbox].
7. Scroll through the list to locate an unassigned [Mailbox number].
8. Select an unassigned [Mailbox number] from the displayed list.
9. Select [Create/Delete].
10. When the [New Mailbox - Assign Passcode] screen displays, use [On] and [Off] to
determine whether or not a passcode will be required to access the Mailbox. If [On] is
selected, use the numeric keypad to enter a numbered passcode, then select the
appropriate [Target Operation] to control when the passcode will be required.
11. Select [Save] to save your settings. (To exit the screen without saving the settings,
select [Cancel].)
12. When the [Mailbox XXX - Create/Delete] screen appears, five selections will be
displayed on numbered horizontal lines. The available selections include: Mailbox
Name, Check Mailbox Passcode, Delete Documents After Retrieval, Delete Expired
Documents, and Link Job Flow Sheet to Mailbox.
13. To assign a name to the Mailbox, select the [Mailbox Name] selection line.
14. Select [Change Settings].
15. Use the touch screen keyboard to enter a name for your Mailbox.
16. When finished entering a name, select [Save]. (To exit the screen without saving the
changes, select [Cancel].)
17. On the [Mailbox XXX - Create/Delete] screen, select any other selections required and
use [Change Settings] to access and make changes. Then select [Save].
18. To exit the [Mailbox XXX - Create/Delete] screen, select [Close].
19. To exit the [Create Mailbox] screen, select [Close].