


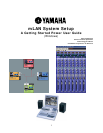
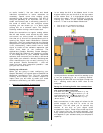
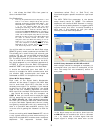


mLAN System: Music Local Area Network
This is an example setup for education purposes
and by no means is the only configuration. For
this article our example mLAN system:
• Motif ES with mLAN16E installed
• i88X – high-quality mLAN I/O expander
• 01X – moving-fader mLAN digital mixer
• Motif Rack (as our non-mLAN module)
• Pair of MSP5 monitors
• Windows XP Computer (Sonar, CubaseSL/SX, SQ01)
• Multi-Part Editor for Motif ES
• Multi-Part Editor for Motif Rack
• Graphic Patchbay Software
• Studio Manager Software
• VST Plug-ins: Pitch Fix, Vocal Rack, Final Master,
(01X Channel Module) – included with 01X
• High quality microphone (not shown)
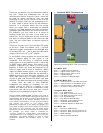
Four 1/4" cables (2 for the Monitor Outs of the
01X to the MSP5s, 2 for the analog outs of the
Motif Rack); you will need 2 MIDI cables (in/out of
the Motif Rack to the 01X). Connect these in/out
of MIDI “B” on the back of the 01X.
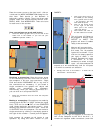
Three Firewire cables (one comes with the i88X,
another with the 01X) you will need a third for the
mLAN16E. Connect the computer to the 01X, the
01X to the mLAN16E, the mLAN16E to the i88X.
The units can be connected in any order, by the
way, but the point is it is just a "daisy chain". The
firewire connections simply need to go from one
device to another. The order is insignificant. When
you see two Firewire Ports on a product (like on
the 01X, mLAN16E, and i88X) these are not IN
and OUT. Each single Port is both IN and OUT.
The order will not matter because all routing
within the Network is done digitally with the
“Graphic Patchbay”.
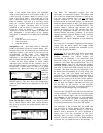
The Motif ES should be set as follows:
• Press UTILITY
• Press F4 CTL ASN
• Press SF4 REMOTE
• Set Mode A = OFF = Port 4 (not used in this setup
– because we will be using the 01X to remote
control the digital audio workstation sequencer)
• Set Mode B = GENERAL = Port 3 (the Motif ES’s
Port 3 will be used to remote control the Motif Rack)
• Press ENTER to make settings
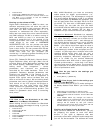
• Press F5 MIDI
• Press SF2 SWITCH
• Set the Local Ctrl = OFF*
• Press SF4 OTHER
• Set MIDI IN/OUT = mLAN
• Set the Thru Port = 2 (This will make the MIDI OUT
jack of the Motif ES available for routing tracks to
yet another module or synthesizer)
• Press STORE to lock in settings
*In this setup with Local Control OFF you would typically
route signal back to the selected tone generator via
track assignment in your sequencing software.
The Motif Rack should be set as follows:
• Press UTILITY
• PAGE to MIDI screen
• Cursor down to MIDI IN/OUT = MIDI (The Motif
Rack will be connected to the MIDI In and Out of
the 01X…In this setup we will use MIDI-B. Connect
the MIDI Out of the Rack to MIDI-B IN on the 01X
and MIDI-B OUT to the Motif Rack MIDI IN).
• Press MULTI to select Multi mode and write the
settings to Flash ROM
• Connect the audio outputs of the Motif Rack to
inputs 3 and 4 of the 01X with two ¼” cables.
• Audio for the Motif ES will be handled by mLAN.
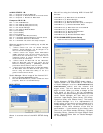
The 01X should be set as follows:
• Press UTILITY to view the UTILITY SETUP MENU
• Press Knob 1 REMOTE – select your desired
software; press Knob 8 Yes to lock it in
We will discuss the setup of the Wordclock Master
a bit later.
Getting Started
Make sure you have the latest version driver
You will need to have installed:
• The mLAN Driver (this will install mLAN Manager,
Auto Connector and the Graphic Patchbay)
• Studio Manager; VST Plug-ins: Pitch Fix, Vocal
Rack, Final Master, (01X Channel Module)
• Multi-Part Editor for Motif Rack (on the mLAN
CDROM)
• Multi-Part Editor for Motif ES (on the Motif ES Tools
CDROM)
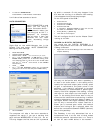
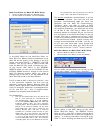
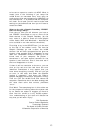
ACTIVATE the mLAN Driver
To activate the mLAN driver you can right click on
the mLAN Manager icon in the computer’s System
Tray - Select ON.
Alternatively, you can use the Windows launch
routine.
2