


an audio “snake”). You can make and break
individual connections or entire selections as
necessary. Spend some time making group
connections and single connections. The skill of
using the patchbay is an important one in any
studio environment and is extremely powerful in
the world of mLAN. You can configure almost
anything you can dream up. It is basic signal
routing but on a network scale. The Graphic
Patchbay makes routing a much easier task.
Relate the connections to regular analog cables.
We will load Voices, recall sounds by their name
and control our entire studio via mLAN. Notice
also that all of this will be accomplished prior to
opening the Digital Audio Workstation software
sequencer. Once you understand how the Yamaha
components in this particular setup are interacting
it will, theoretically, make clearer how to route
signal to tracks of the software sequencer and
return them back to the hardware. The
applications (Graphic Patchbay, Studio Manager,
and the Multi-Part Editors) are capable of running
in the background of your selected sequencer
software…and eventually will be able to be stored
right within your software. Yamaha, Steinberg and
other manufacturers are currently working on a
new protocol “Studio Connections” – that will
make just such total integration possible – and
give you real “total recall”.
Setting up a Network
When you are going to start configuring your
Graphic Patchbay it is a good idea to establish the
Wordclock connections first. This will eliminate
clocking errors before you connect outputs to
inputs. Next you will want to make your audio
connections and finally your MIDI connections.
•
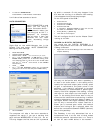
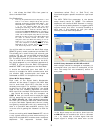
Network Wordclock Connections
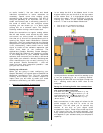
In our setup the 01X is the Master clock. In the
diagram above you see the 01X at the top center
of the screen shot. It is highlighted (black line
outlines the node). You can highlight a node by
clicking any where in the colored background
within it. To set is as the Master Wordclock:
• Click on the “m” or Master box within it
• Click on the “1 Mstr” icon on the toolbar
•
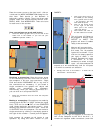
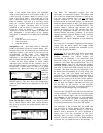
Network AUDIO Connections
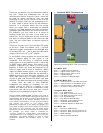
In this particular example we will be setting up as
if we are preparing to do a tracking session:
Recording the Motif ES and the Rack through the
01X - sending audio and/or MIDI data to the
computer.
Setup the following Audio view connections:
OUT [channels]Æ IN [channels]
01X Audio Out [1-24]Æ Computer Audio In [1-24]
Computer Audio Out [1-2]Æ 01X Audio In [17-18]
mLAN16E Audio Out [1-16]Æ 01X Audio In [1-16]
i88X Audio Out [1-8]Æ mLAN16E Audio In [1-8]
(Shown above)
Audio connections in this setup will allow the 24
mLAN outputs of the 01X to arrive at the
Computer. This will allow you to connect any
channel of the 01X to your digital audio
workstation’s inputs. These 24 are made up of the
8 AD Inputs plus the 16-mLAN channels. How
many tracks you are able to record simultaneously
will depend on your software and your computer’s
capability.
5